
Dear Michelle,
You must come back IMMEDIATELY. I have had one of the top ten meals of my life.
I have many things to tell you about: Thomas Keller’s split pea soup, my time at home, naan cooked on the grill, rose infused vinegar, but this trumps all of them. Jeff heard about this place a while ago, a little diner car restaurant called M. Wells in Queens run by two transplants from Montreal, and decided to take me there for our first anniversary.
I was fairly excited, having read good things about escargot, bone marrow, calves brains, you know, the things I tend to get curious about. We took the G train up into Long Island City, and walked a short way to the diner.
The sun was setting, the night was mild and pleasant, and my hunger suddenly piqued to the point where I start getting a little weird. We entered the unassuming little diner car to an enclave of clatter and chatter, full of happy faces and promising smells. We wanted to try several things, and our waiter recommended five to six small dishes, so we hemmed and hawed and finally chose those that most intrigued us.
The escargot with bone marrow was one of the dishes I’d read about and had really wanted to try, and immediately when it arrived I popped a piping hot snail covered in fat, parsley and bread crumbs in my mouth. I was lucky I didn’t burn myself! After that first hot but satisfying bite, I tried the cold dish that Jeff had wanted to order, Porchetta Sierra, while the escargot cooled a bit.
I had not been all that excited about this dish; it was described as thinly sliced pork with a mackerel mayo and fried caper berries. Roast pork isn’t my favorite, but I was interested enough by the idea of it with fish mayonnaise. This ended up being my favorite dish, so elegant in its simplicity. The very juicy, thinly sliced roast pork had plenty of melty, not chewy, fatty bits. It was laid out in a circle on a plate, and the inner part of that circle was spread with a greyish mayo, and sprinkled all over were fried capers.
This mayonnaise was the perfect amount of salty and umami for the pork, and the fried capers added a pop of much needed color and crunch. I don’t even like capers, which usually taste like mildew to me, but fried they are delicious! Jeff didn’t like it as much because mayonnaise weirds him out, but he did like his first ever taste of escargot, which was delicious, perfectly cooked. I was disappointed, and this was my only disappointment, that the marrow was liquid. I don’t know if this was by design or not, but I’d have liked spreadable marrow for the crunchy little toasts on the side instead of molten marrow that needed to be soaked up from the plate.
Next out was caesar salad, Grouper cordon blue, and smoked chicken legs with fries. I don’t remember in what order we ate, but I am sure the level of gluttony we reached might have been just short of a deadly sin. The salad, Jeff’s idea as a light addition to the meal, was just that. It was a beautiful pile of green with a few golden croutons, all covered with a generous feathery fluff of fine, long bits of grated cheese. The dressing was made with smoked herring instead of anchovies, a nice touch.
The Grouper cordon blue was good, although I was starting to recognize the physical limits of my stomach at this point. The fish was fried, with a crispy thin crust (I’m guessing cornmeal), combined with mortadella, pickled ramps (YUM), and a sour cream dressing on a thin toasted sourdough roll. That sauce was so good that even after I was uncomfortably stuffed, I was eating the leftover roll with the dressing soaked in.
The most impressive dish of the night was the smoked chicken legs with fries. You see that description, and you think of a plate of drumsticks on fries, maybe with some sort of sauce, right? I did. What we got was a giant platter with a WHOLE CHICKEN LEG, thigh to claws, on top of biscuits and thin crunchy fries, all dripping with the best barbeque sauce ever. I say bbq sauce, but it was more like a cross between that and gravy (and it would have made an excellent poutine), thick and glossy and sweet and smoky and spicy. When I try to replicate this, I will make a white roux, then add chicken stock, tomato paste, apple cider vinegar, cayenne, paprika, and brown sugar. We each ate enough of the leg to taste it, as it was the most likely to be good reheated. That will be our dinner tonight, and the bones will go in with a ham hock and bacon to some baked beans I’ll make later in the week. You can bet I’ll try to make them taste like that sauce.
When our waiter came by to ask about dessert (sigh), I told him this was the best meal I’d had all year, that it was exemplary. He returned with a bottle of maple syrup liquor (delicious!), and did a shot with us. It was a truly memorable evening, and we MUST go back when you return!
Saturday, July 16, 2011


Thursday, July 7, 2011
Frozen Chocolate Truffles

 Dear Devon,
In an effort to get a bit more language practice, I registered for a cooking class at my local civic center. Unfortunately, there are no molecular gastronomy courses, but at 50 Euros a semester, I was hardly going to register a complaint. I put my money down for a chocolate themed dessert class. I had hoped that I’d learn to make liquor-filled bonbons but the class was more focused on baked goods than confections. In practice and theory, I knew how to make most of the recipes. In hindsight, it was for the better. My language skills are steadily improving but my comprehension greatly depended on my prior baking experience.

 The partial meltdowns of my anxious teacher could fill an entire volume. In many ways, the course was particularly cruel to her. The kitchen is hardly equipped for teaching let alone actually baking. There was the constant threat of equipment malfunction (fridge or microwave), lack of basic materials like bowls, whisks or scale, and then there was the portly student from whose mouth issued a constant and unrelenting stream of advice, stories, loosely-linked words, and general nonsense. In six weeks, I know more details about her life than yours.
Given these setbacks, the class altered my perceptions of what is actually possible in the kitchen. The obvious lack of materials and occasional mistake didn’t stop us from making some really fantastic desserts. Sure, it had the distinct look of homemade and yes, at times, there was the failed, trash bound cake or cookies. She proved to me that it was possible to make and not just purchase macaroons. Truffles are delightfully easy to make and can even serve as the base for an amazingly decadent, dark chocolate cake.


I have been mulling over the recipes and the class for a few weeks, trying to decide where or if to begin experimenting. I admit, when looking over the packet of recipes, I am largely uninspired but then again, it usually isn’t the recipe that inspires me to start cooking, it’s the market.
There’s a wonderful stand at La Boqueria that specializes in foods of the forest. In the fall, the stand overflows with morels, truffles, wild mushrooms, and strange looking roots. Summer’s bounty includes zucchini blossoms, white asparagus, and wild strawberries. These berries are wonderful. They are about the size of my fingernail but intensely sweet and amazingly fragrant. One tiny berry is tastier than an entire giant American strawberry. I eat them like candy. Encasing them in chocolate truffle seemed the next logical step.

Frozen Chocolate Truffles
(makes 36)
100 grams of butter
50 grams of sugar (confectioner’s is best, but granulated will do)
100 grams of chocolate (70 % cacao)
1 egg yolk
1 tsp hazelnut oil (optional)
1 tsp espresso
24 frozen wild strawberries
¼ cup cocoa powder
1/4 cup coconut (optional)
Wash and gently dry wild strawberries. Place berries without touching one another on a small tray and freeze. Leave overnight.
Gently melt butter over a pot of simmering water. Remove melted butter from the heat and whisk in sugar and egg yolk. In a separate bowl, melt the chocolate with hazelnut oil and water. Add the butter mixture to the melted chocolate and thoroughly mix. Cool in the fridge until firm to the touch, roughly 2 hours.
When the chocolate mixture is set and the berries have frozen, begin forming the truffles. Using two spoons, scoop a bit of the ganache into each spoon. Center one frozen berry in one of the two spoons and cover the berry with the ganache from the second spoon. Work the spoons around each other, to form a small ball. It is similar to forming quenelles.
In a small bowl, sift in cocoa powder. Roll the freshly formed truffle in cocoa powder. I had some extra truffles so I rolled them in coconut. Set the finished truffle on a platter and continue with the remaining berries. Freeze the entire tray of truffles until set, roughly 2 hours.
Store in the freezer in a plastic container.
Note: Be sure to work quickly. The truffle mix will begin to soften if left out too long and will make forming the truffles difficult. If this happens, pop the bowl back into the fridge for a bit until the mixture hardens again.

Saturday, June 25, 2011
Fira Lactium: Vic

 Dear Devon,
Last November, fresh off of six weeks of intensive Spanish lessons, I tested my new skills at my first Barcelona dinner party. Seated with eight other guests around a large wooden table and a generous dinner of wild mushroom risotto and braised chard, I listened to the excited chatter. The conversations moved quickly and fluidly. I strung together snippets of phrases and pieces of dialogue, my tongue stilled by their effortless chatter.

 The conversation shifted to food, specifically cheese. One cheese-loving guest praised a soft, fragrant cheese from the Basque Country in emotional terms, finally pounding his fist on table in excitement and frustration with the gentle teasing of our fellow table companions. I had to interrupt. How often do I run across such an ardent cheese enthusiast? That’s when he told me where to find cheese heaven, otherwise known as the Fira Lactium in Vic, the largest town in the Catalan comarca of Osona. Like Christmas, it comes only once a year in May. I jotted down the details and even made a note in my calendar to remind myself to look for the fair in April. Six months later we were on a train headed north to the Fira Lactium.

Vic was in the full throws of its Saturday market, but the big event of the day was the cheese fair. Vegans and lactose-intolerants be warned: This is glorious dairy indulgence. I was warned to restrain myself to avoid overwhelming my tastebuds. The sour, flowery, rich smell of cheese was everywhere, as were the samples! Producers’ stands lined the street and a temporary eating hall had been erected at the heart of the fair.

 When we arrived, the cheese competition was in full swing. Four tables of judges scribbling, sniffing, poking, and eating cheese filled most of the tent. Two sample plates with an assortment of hot and cold cheeses were being sold. Buying both of these meant trying sixteen different cheeses. For our panel of three, these two plates were more than enough. One cheese in particular had our heads spinning. We brought the sample to the front to ask for more details, only to be told that since the competition was still in progress, the name and origin of the cheese could not be revealed. Undeterred, we took our small sample to the each of the thirty-odd cheese stands, hoping the vendor would recognize his cheese. Unfortunately, this didn’t work either: We never did find our mystery cheese, but we boarded the train to Barcelona carrying artisanal yogurts, cheesecake, and of course, cheese.
 The real surprise of the excursion was that we bumped into our fist-pounding friend, whom we found tasting the very same cheese from the Basque country that he had praised to us six months earlier.
Saturday, June 18, 2011
Coconut & Sea Salt Brownies
 Dear Devon,
A few months ago, Melissa Clark had a recipe in the Times for brownies made with olive oil, sea salt, and shredded coconut. I bookmarked the recipe, and ran to the store to buy some shredded coconut, but it wasn’t until last week that I got around to making the brownies.
I thought I knew how to bake the perfect brownies: Moist, dense, fudgy squares with a crunchy crust. But Ms. Clark’s recipe gave me something to think about. She substitutes olive oil for butter, runs a layer of coconut through the brownie, and dusts the top with sea salt for extra flavor. Her tweaking of a classic recipe and play with unusual ingredients grabbed my interest right away.

I’ve only started to experiment with olive oil as a baking ingredient very recently. The wide variety of good and reasonably priced Spanish olive oil, plus my lack of an eggbeater, has made me reconsider recipes in which I always used butter. It’s broadened my repertoire. I’ve found that olive oil gives a nice fruitiness to cakes and baked goods, and renders a moist crumb that is sometimes lacking in butter-laden recipes.
 Following Melissa Clark’s advice, I sprinkled the top of my brownies with good quality sea salt from Mallorca. This topping gave the brownies an unusual character and flavor, a bit peppery, and even buttery. Since buying a box of sea salt, my palette has felt the sparkle of salt. It’s become indispensible on my kitchen table, topping everything from fresh salads to pastas primavera. If I keep discovering new gastronomic delights, I’ll have to throw out all my clothes to make room for them in my suitcase.
Coconut & Sea Salt Brownies
(adapted from Melissa Clark NY Times 2/4/2011)
½ cup plus 2 tbsp water, boiling
1/3 cup cocoa powder, unsweetened
2 oz chocolate, coarsely chopped (70% or higher)
3 large eggs
1 egg yolk
1 tsp hazelnut oil
1 cup sugar
1 ¾ cup all-purpose flour, sifted
¾ tsp salt
2 ½ oz chocolate, chopped
1 cup shredded coconut
1 tbsp fleur de sel
Preheat oven to 350 degrees F. Butter a 9 x 13 inch pan. Set aside.
Sift cocoa powder into a large mixing bowl. Pour in boiling water and whisk until cocoa is dissolved. Add 2 oz chopped chocolate. Stir until chocolate is melted. Add olive oil and hazelnut oil. Beat in eggs one at a time, until the yolks disappear. Gradually add sugar. The mixture will look curdled and at first the olive oil will not mix into the chocolate, but keep working. With steady whisking, the batter will come together into a smooth chocolatey-mixture. Using a rubber spatula, fold in flour and table salt. Fold in 2 ½ oz chopped chocolate.
Pour batter into the oiled pan. Sprinkle with sea salt and shredded coconut. It is easiest to start with the sea salt. It’s amazing how easily the sea salt hides in the finely shredded coconut.
Bake 25 to 30 minutes. The toothpick test doesn’t work here, so be sure your oven is at the right temperature. I also like to turn on the broiler for just a bit, to get the coconut nicely toasted.
Cool on a wire rack. Cut into nicely sized squares.
Wednesday, June 15, 2011
Red Onion and Cherry Tomato Pizza
 Dear Devon,
There are some combinations of flavors that should be repeated, and repeated often. For me, red onion and fresh cherry tomatoes with roasted garlic is one of those unbeatable combinations. About two weeks ago, I walked past an artisanal pizza shop. A fresh tray of hot pizza topped with red onions and cherry tomatoes had just been set in the display window. The clean white tiled interior and chalkboard menu drew me into the shop. It was dangerously close to dinnertime, but I bought a slice, anyway, and walked home munching on warm pizza.

 Fingers barely wiped clean of grease, I thought to myself: I can do this, and I can do it better. I set a frozen ball of pizza dough out to defrost and made a mental list of ingredients: cherry tomatoes, red onion, garlic, and basil.
Don’t expect to get the most scrumptious results without using the best quality ingredients. Lately, I have been getting some delicious red cherry tomatoes from the local market. Sweet and bright, these tomatoes are great in salads, sauces, or as a refreshing snack. I have taken to eating them cold, straight out of the fridge. My other recent luxury is fresh basil– I was planning to make a big batch of pesto– so a few big leaves made it onto my pizza, as well. A few slices from a wedge of raclette cheese added that last touch to the rich flavors fo the pizza. Requests for a second round have already been recorded!

 Red Onion and Cherry Tomato Pizza
Pizza dough
1 red onion
5 cherry tomatoes, sliced
3 cloves of garlic, smashed and sliced
¼ to ½ cup tomato sauce
cheese
 Preheat oven to 450 degrees F.
Roll out dough on a lightly floured surface, forming a large disk. Sprinkle a bit of cornmeal on the pizza board and set the prepared dough on top. Spread a generous spoonful of tomato sauce over the dough. Top with thinly sliced red onions and garlic. Next, top with cheese and tomatoes.
Bake in the oven until golden brown and the cheese is nicely melted, about 15 minutes.

Monday, June 6, 2011
Chocolate Chip Cookies - Crispy Style
 Dear Devon,
There may be amazing desserts in Europe, but there isn’t anything quite like a good old American chocolate chip cookie. I am a full-blown cookie monster, and for the past seven months, I’ve have been satisfying my cravings with European “cookies.” Flat, hard, crunchy, more like crackers than the buttery, sweet, dense morsels that we call cookies. They are adequate, but some days, a girl just needs her cookies!


I asked a Europe-bound friend to bring a box of brown of sugar, so I could get a bit of the US into my Barcelona apartment. I am thrilled that she dragged it eastward in her suitcase (warm hugs to her boyfriend, who ran to the corner store to pick up my last minute request). Brown sugar in hand, I prepared for a chocolate-chip-cookie-baking marathon.
About half way through the recipe, I realized that I was ½ cup short on flour. I was hardly going to run to the store for an extra ½ cup of flour. Instead, I substituted that ½ cup of flour for an equal amount of shredded coconut. How big of an effect could it have?
 Well… do you know Tate’s Bake Shop? They turn out amazingly crispy and almost caramel-like chocolate chip cookies. Unassumingly packed into clear plastic bags with big green labels, these cookies were an occasional afternoon treat in my New York office. And while I never turned down a Tate’s cookie, I was not convinced that their style could be recreated in the home kitchen. In my current state of deprivation, impatience was a virtue… I inadvertently discovered the magical proportion of butter to flour to chocolate that must be the secret of Tate’s chocolate chip crisps!
As a side note, these cookies are best eaten cold, with a nice cup of tea or coffee– they’re actually not all that great for ice-cream sandwiches.

Crisp Chocolate Chip Cookies
(makes about 6 dozen small cookies)
1 ½ cups all-purpose flour
½ cup shredded coconut
1 tsp salt
¾ tsp baking soda
8 oz butter, at room temp (2 sticks)
1 cup sugar
2/3 cup light brown sugar (packed)
2 large eggs
12 oz dark chocolate, chopped into large chunks
1 cup hazelnuts, chopped
Preheat oven to 375 degrees F. Line baking sheet with parchment paper or silpat.
In a large bowl, whisk together flour, shredded coconut, salt, and baking soda. Set aside.
In a second large bowl, beat butter until smooth with a wooden spoon (or to save your arm strength for carrying groceries from the subway, use an electric mixer). Add brown and white sugars, mix until well-blended. Beat in eggs one at a time until each is well-incorporated. In three portions, mix in dry ingredients, nuts, and chocolate chunks. Cool in the fridge for 1 hour, until the dough is firm and set.
Using two spoons, carefully transfer dough onto baking sheets. Set far apart, about 2 inches. The cookies will spread in the oven.
Bake the cookies, 8 to 12 minutes. Checking the oven at the 8 minute mark. When the cookies are nice and brown, pull the sheet from the oven and let cool for 1 or 2 minutes. The cookies will harden as they cool. Set aside on a wire rack.
Repeat with the remaining dough, cooling baking sheet between batches.

Friday, June 3, 2011
Mallorca, the real ensaimada

Dear Devon,
One of my favorite treats is a fluffy, spiral-shaped ensaimada. Dusted with a generous sprinkling of powdered sugar, the simple yeasted pastry has a history that extends back to the Middle Ages. The story goes that the spiral shape was modeled after the ends of Torah scrolls. The ensaimada can be found in every pastry case. (I am particularly fond of the ones offered at my corner shop.)

 Mallorca claims to make the true ensaimada. I suppose Paris could claim to make the true croissant, but are such declarations necessary? The island of Mallorca seems to think so. A sticker denoting geographical indication, similar to the French system of Appellation d'origine controlée, appears in every ensaimada-selling establishment, as does a bright orange sticker on each ensaimada box. The poster sums up their feelings.
A week ago, I was fortunate enough to sample the “real” ensaimada. A friend, who made a quick two-day jaunt to the sunny town of Palma, brought one up to Barcelona. Transported in an octagonal blue box patterned with white dots and stamped with the orange Consell Regulador Indicació Geográfica Protegida sticker, the ensaimada rested under a soft blanket of powdered sugar and white tissue. Larger than any reasonable single serving, this could easily feed four people. I later learned that some reached the size of small dining table: Imagine putting one of those in the overhead bin!
 I whipped out my camera, took some pictures, and couldn’t wait until morning, when this pillowy treat would be my breakfast. I wasn’t disappointed. The bread was light and fluffy, filled with a subtly sweet jelly-like paste, and perfect with that first cup of coffee. Is it better than the Barcelona varieties? I’m not so sure. But, I think it’s a perfect excuse to head over to my corner shop for a second look.

Sunday, May 29, 2011
Tarte Au Citron
 Dear Devon
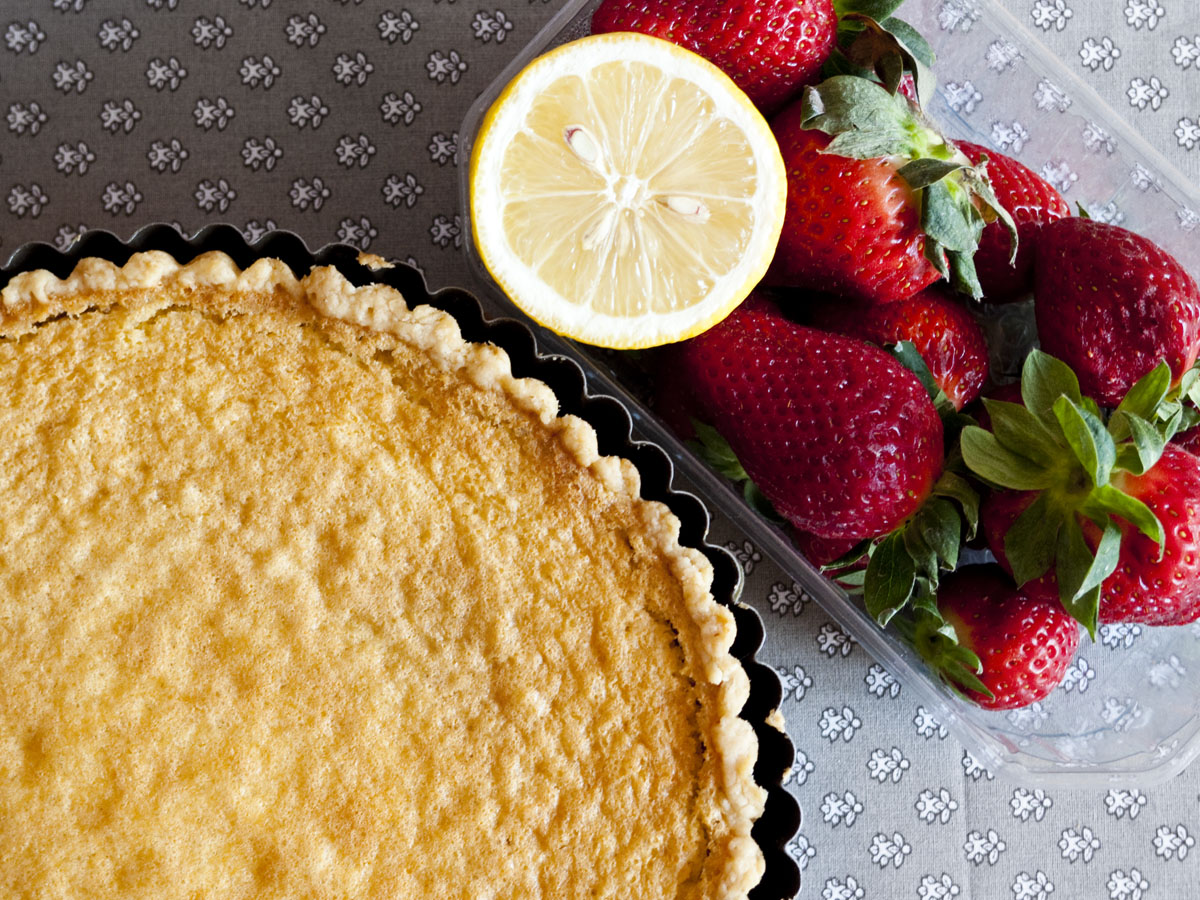
Hands down, Anne Willan’s recipe for tarte au citron is the best. One of my all time favorite desserts, tarte au citron is one of late afternoon, last minute desserts. I have experimented with graham cracker crumb crusts, whizzed whole oranges with sugar in food processors, and topped pale yellow tartes with fresh raspberries. Julia Child, Dorie Greenspan, Patricia Wells, Ina Garten, all have their tarte au citron recipes (which I have meticulously ranked), but Anne Willan’s recipe recently catapulted to the top.
A few weeks back, I hosted a small dinner party. The menu included a creamy blanquette de veau, simple garden salad, and two desserts: tarte au citron and a lovely fruit-topped, whipped cream laden cake from the pastry shop. Dinner was followed by an all night marathon of friendly poker, after which that wonderful cake was a welcome sight. It was a great evening and reminded me of why I love hosting dinner parties. I have a chance to serve a variety of recipes that would otherwise remain in black and white print.

 Except for one adjustment, I followed her recipe exactly. The recipe called for ¾ cup almond flour. I’m still not so good with the numbers, so I ordered too small a bag from the dry goods stand. So, I added dried coconut to equal the full ¾ cup. The coconut was a nice addition, subtly balancing the tartness of the lemon filling. However, the biggest surprise was the call for pulverized almond instead of cream. I was a bit hesitant at first, but am now a firm believer in almond flour over cream in all tarte au citron recipes. The tart had a nice light texture and held its shape nicely after each slice. I will never go back to cream, when almond flour can be substituted.
Whipping the egg and lemon juice to the ribbon stage nearly killed me. My shoulder muscle is cramping as I type. I have a new respect for those pre-KitchenAid chefs. I have temporarily shelved an attempt at chocolate mousse in favor of the less labor-intensive dessert of cut fruit.
 I intended to top the tarte with macerated strawberries. But at the last moment, I opted to serve the berries at the end as a finishing course. The tarte is so good, that it doesn’t need further embellishments. It is a stand alone dessert.
Pull your copy of The Country Cooking of France from your shelf and try it. I’m dying to hear your thoughts, but please use your electric beater.
Tarte Au Citron
(serves 8)
Pate a Sucre
I used Julia Child’s recipe from Mastering the Art of French Cooking.
Lemon Filling
½ cup ground almonds
¼ cup shredded coconut
3 /4 cup granulated sugar
3 eggs
grated zest of 2 lemons
¼ cup lemon juice
2/3 cup butter melted
Prepare pate a sucre according to Julia Child’s recipe from Mastering the Art of French Cooking.
Blind bake the tart shell until light golden brown.
For the filling, beat eggs and sugar until the mixture until thick and pale yellow. The mixture should leave a ribbon trail when the whisk is lifted. Stir in the lemon zest, lemon juice, and butter. Stir in the ground almonds and the coconut.
Set the tart shell on a hot baking sheet and pour in the filling. Bake until set and golden brown, 25 to 30 minutes. Let cool on a wire rack before unmolding. Serve at room temperature.

Thursday, May 26, 2011
Pan Roasted Zucchini Sandwiches

 Dear Devon,
I can’t believe a whole month has passed since I last wrote. As of late March, my life has been busy with visits from friends and family, all eager to enjoy the sunshine, fresh seafood, and explore the streets of Barcelona. And then there was all the travel: Two trips to Madrid, a weeklong stay in Andalucia, and a short daytrip to Montserrat.
Renee came out for a month long visit, took a week of Spanish classes, and was a willing traveling companion. She organized a short trip to Madrid, which included a visit to the Royal Palace, Sunday morning rambling at El Rastro (the biggest flea market in the world), and an afternoon at the Prado Museum. In between those stops, I dragged her through the streets of Madrid, scouting out churches, convents, and… restaurants. If you are vegetarian, Madrid isn’t the friendliest of cities, but if you love pork, you’ve hit the jackpot. After her departure in early May, two more guests took their turns sleeping on the inflatable mattress in the living room.


Our last guest left early Monday morning. The air mattress can finally get its much- needed rest. The process of putting the house back together began this morning, with long neglected errands penciled in for the afternoon. I am easing back into my routine and gearing up for a hot, hot summer. Thanks to one of my guests, we discovered that some of the best ice cream in Barcelona is blocks from the apartment. Our brand-new, and all-too-necessary ice cube trays are cooling in the freezer, and today, the all-important fan will be broken out of its box.
Today’s lunch will also be low key. Pan roasted zucchini, fresh tomato, and Mahon cheese between slices of grilled baguette. A cow’s milk cheese from the Balearic Islands just south of Barcelona, Mahon cheese is smooth and rich with a sharp floral note. I usually serve it with a slice of crisp apple, but have found that its strong flavor complements the butter-like taste of roasted zucchini. It’s the perfect, limited prep sandwich for maximum taste.

Pan Roasted Zucchini Sandwiches
(serves 2)
One loaf of fresh baguette (or day old works nicely too)
1 zucchini, sliced lengthwise
1 tomato, sliced into generous ½ inch slices
Mahon cheese, sliced
1 garlic clove, peeled
Olive oil
Salt
Heat up a skillet with a drop of olive oil. Halve baguette and slice lengthwise. Lightly drizzle sliced bread with olive oil. When the skillet is nice and hot, set baguettes cut side down into the skillet. Slowly toast, until golden brown. Remove. Scrape the peeled garlic clove over the hot, toasted bread. Top with tomato. Place sliced cheese on the second half. Set aside. Add a drop more olive oil. Over medium heat, slowly cook sliced zucchini until golden brown. Set cooked zucchini over cheese and bread.

Subscribe to:
Posts (Atom)

 Posts
Posts


