Showing posts with label dessert. Show all posts

Saturday, June 18, 2011

Coconut & Sea Salt Brownies

Dear Devon,

A few months ago, Melissa Clark had a recipe in the Times for brownies made with olive oil, sea salt, and shredded coconut. I bookmarked the recipe, and ran to the store to buy some shredded coconut, but it wasn’t until last week that I got around to making the brownies.

I thought I knew how to bake the perfect brownies: Moist, dense, fudgy squares with a crunchy crust. But Ms. Clark’s recipe gave me something to think about. She substitutes olive oil for butter, runs a layer of coconut through the brownie, and dusts the top with sea salt for extra flavor. Her tweaking of a classic recipe and play with unusual ingredients grabbed my interest right away.


I’ve only started to experiment with olive oil as a baking ingredient very recently. The wide variety of good and reasonably priced Spanish olive oil, plus my lack of an eggbeater, has made me reconsider recipes in which I always used butter. It’s broadened my repertoire. I’ve found that olive oil gives a nice fruitiness to cakes and baked goods, and renders a moist crumb that is sometimes lacking in butter-laden recipes.

Following Melissa Clark’s advice, I sprinkled the top of my brownies with good quality sea salt from Mallorca. This topping gave the brownies an unusual character and flavor, a bit peppery, and even buttery. Since buying a box of sea salt, my palette has felt the sparkle of salt. It’s become indispensible on my kitchen table, topping everything from fresh salads to pastas primavera. If I keep discovering new gastronomic delights, I’ll have to throw out all my clothes to make room for them in my suitcase.


Coconut & Sea Salt Brownies
(adapted from Melissa Clark NY Times 2/4/2011)

½ cup plus 2 tbsp water, boiling
1/3 cup cocoa powder, unsweetened
2 oz chocolate, coarsely chopped (70% or higher)
3 large eggs
1 egg yolk
1 tsp hazelnut oil
1 cup sugar
1 ¾ cup all-purpose flour, sifted
¾ tsp salt
2 ½ oz chocolate, chopped
1 cup shredded coconut
1 tbsp fleur de sel

Preheat oven to 350 degrees F. Butter a 9 x 13 inch pan. Set aside.

Sift cocoa powder into a large mixing bowl. Pour in boiling water and whisk until cocoa is dissolved. Add 2 oz chopped chocolate. Stir until chocolate is melted. Add olive oil and hazelnut oil. Beat in eggs one at a time, until the yolks disappear. Gradually add sugar. The mixture will look curdled and at first the olive oil will not mix into the chocolate, but keep working. With steady whisking, the batter will come together into a smooth chocolatey-mixture. Using a rubber spatula, fold in flour and table salt. Fold in 2 ½ oz chopped chocolate.

Pour batter into the oiled pan. Sprinkle with sea salt and shredded coconut. It is easiest to start with the sea salt. It’s amazing how easily the sea salt hides in the finely shredded coconut.

Bake 25 to 30 minutes. The toothpick test doesn’t work here, so be sure your oven is at the right temperature. I also like to turn on the broiler for just a bit, to get the coconut nicely toasted.

Cool on a wire rack. Cut into nicely sized squares.

Monday, June 6, 2011

Chocolate Chip Cookies - Crispy Style

Dear Devon,

There may be amazing desserts in Europe, but there isn’t anything quite like a good old American chocolate chip cookie. I am a full-blown cookie monster, and for the past seven months, I’ve have been satisfying my cravings with European “cookies.” Flat, hard, crunchy, more like crackers than the buttery, sweet, dense morsels that we call cookies. They are adequate, but some days, a girl just needs her cookies!


I asked a Europe-bound friend to bring a box of brown of sugar, so I could get a bit of the US into my Barcelona apartment. I am thrilled that she dragged it eastward in her suitcase (warm hugs to her boyfriend, who ran to the corner store to pick up my last minute request). Brown sugar in hand, I prepared for a chocolate-chip-cookie-baking marathon.

About half way through the recipe, I realized that I was ½ cup short on flour. I was hardly going to run to the store for an extra ½ cup of flour. Instead, I substituted that ½ cup of flour for an equal amount of shredded coconut. How big of an effect could it have?

Well… do you know Tate’s Bake Shop? They turn out amazingly crispy and almost caramel-like chocolate chip cookies. Unassumingly packed into clear plastic bags with big green labels, these cookies were an occasional afternoon treat in my New York office. And while I never turned down a Tate’s cookie, I was not convinced that their style could be recreated in the home kitchen. In my current state of deprivation, impatience was a virtue… I inadvertently discovered the magical proportion of butter to flour to chocolate that must be the secret of Tate’s chocolate chip crisps!

As a side note, these cookies are best eaten cold, with a nice cup of tea or coffee– they’re actually not all that great for ice-cream sandwiches.


Crisp Chocolate Chip Cookies
(makes about 6 dozen small cookies)

1 ½ cups all-purpose flour
½ cup shredded coconut
1 tsp salt
¾ tsp baking soda
8 oz butter, at room temp (2 sticks)
1 cup sugar
2/3 cup light brown sugar (packed)
2 large eggs
12 oz dark chocolate, chopped into large chunks
1 cup hazelnuts, chopped

Preheat oven to 375 degrees F. Line baking sheet with parchment paper or silpat.

In a large bowl, whisk together flour, shredded coconut, salt, and baking soda. Set aside.

In a second large bowl, beat butter until smooth with a wooden spoon (or to save your arm strength for carrying groceries from the subway, use an electric mixer). Add brown and white sugars, mix until well-blended. Beat in eggs one at a time until each is well-incorporated. In three portions, mix in dry ingredients, nuts, and chocolate chunks. Cool in the fridge for 1 hour, until the dough is firm and set.

Using two spoons, carefully transfer dough onto baking sheets. Set far apart, about 2 inches. The cookies will spread in the oven.

Bake the cookies, 8 to 12 minutes. Checking the oven at the 8 minute mark. When the cookies are nice and brown, pull the sheet from the oven and let cool for 1 or 2 minutes. The cookies will harden as they cool. Set aside on a wire rack.

Repeat with the remaining dough, cooling baking sheet between batches.

Sunday, May 29, 2011

Tarte Au Citron

Dear Devon

Hands down, Anne Willan’s recipe for tarte au citron is the best. One of my all time favorite desserts, tarte au citron is one of late afternoon, last minute desserts. I have experimented with graham cracker crumb crusts, whizzed whole oranges with sugar in food processors, and topped pale yellow tartes with fresh raspberries. Julia Child, Dorie Greenspan, Patricia Wells, Ina Garten, all have their tarte au citron recipes (which I have meticulously ranked), but Anne Willan’s recipe recently catapulted to the top.

A few weeks back, I hosted a small dinner party. The menu included a creamy blanquette de veau, simple garden salad, and two desserts: tarte au citron and a lovely fruit-topped, whipped cream laden cake from the pastry shop. Dinner was followed by an all night marathon of friendly poker, after which that wonderful cake was a welcome sight. It was a great evening and reminded me of why I love hosting dinner parties. I have a chance to serve a variety of recipes that would otherwise remain in black and white print.

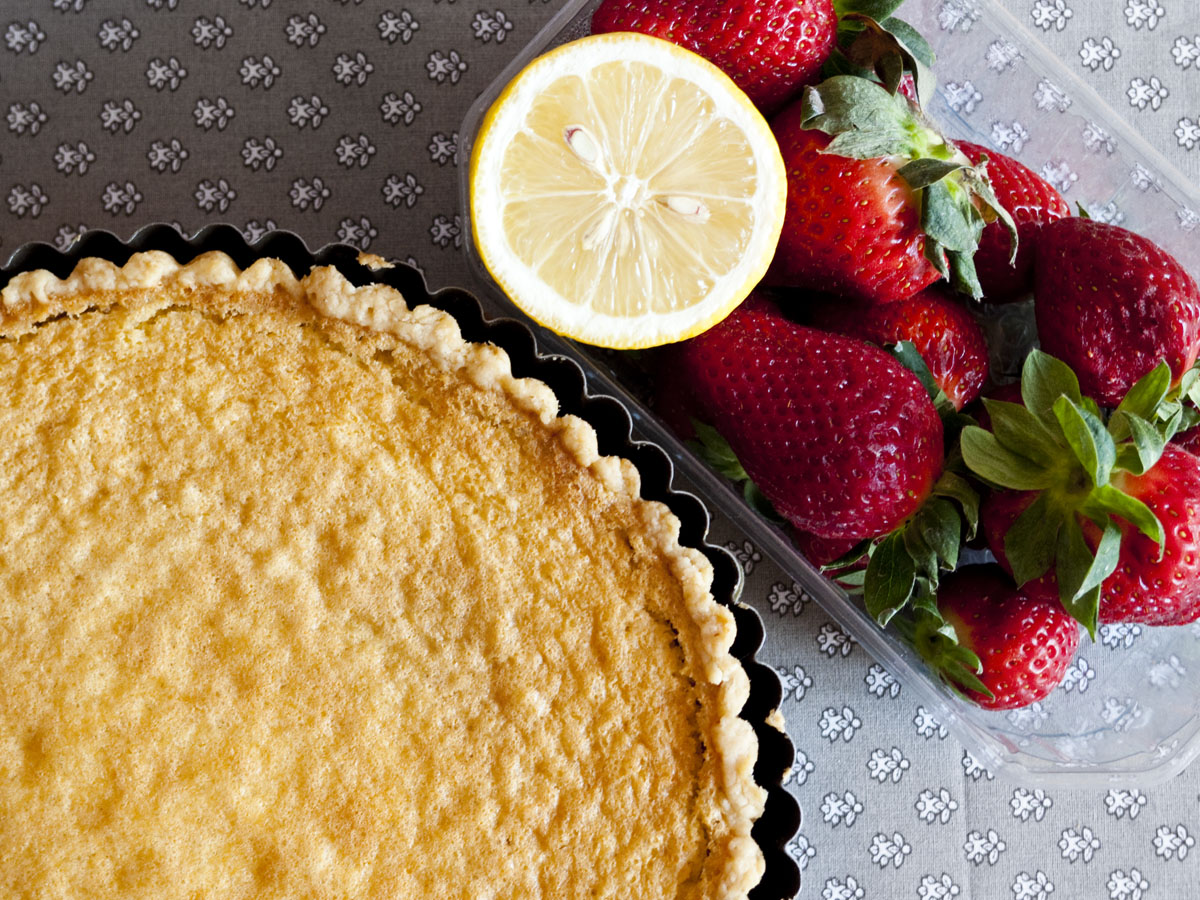
Except for one adjustment, I followed her recipe exactly. The recipe called for ¾ cup almond flour. I’m still not so good with the numbers, so I ordered too small a bag from the dry goods stand. So, I added dried coconut to equal the full ¾ cup. The coconut was a nice addition, subtly balancing the tartness of the lemon filling. However, the biggest surprise was the call for pulverized almond instead of cream. I was a bit hesitant at first, but am now a firm believer in almond flour over cream in all tarte au citron recipes. The tart had a nice light texture and held its shape nicely after each slice. I will never go back to cream, when almond flour can be substituted.

Whipping the egg and lemon juice to the ribbon stage nearly killed me. My shoulder muscle is cramping as I type. I have a new respect for those pre-KitchenAid chefs. I have temporarily shelved an attempt at chocolate mousse in favor of the less labor-intensive dessert of cut fruit.

I intended to top the tarte with macerated strawberries. But at the last moment, I opted to serve the berries at the end as a finishing course. The tarte is so good, that it doesn’t need further embellishments. It is a stand alone dessert.

Pull your copy of The Country Cooking of France from your shelf and try it. I’m dying to hear your thoughts, but please use your electric beater.

Tarte Au Citron
(serves 8)

Pate a Sucre
I used Julia Child’s recipe from Mastering the Art of French Cooking.

Lemon Filling
½ cup ground almonds
¼ cup shredded coconut
3 /4 cup granulated sugar
3 eggs
grated zest of 2 lemons
¼ cup lemon juice
2/3 cup butter melted

Prepare pate a sucre according to Julia Child’s recipe from Mastering the Art of French Cooking.

Blind bake the tart shell until light golden brown.

For the filling, beat eggs and sugar until the mixture until thick and pale yellow. The mixture should leave a ribbon trail when the whisk is lifted. Stir in the lemon zest, lemon juice, and butter. Stir in the ground almonds and the coconut.

Set the tart shell on a hot baking sheet and pour in the filling. Bake until set and golden brown, 25 to 30 minutes. Let cool on a wire rack before unmolding. Serve at room temperature.

Monday, February 14, 2011

Blood Orange Olive Oil Cake

Dear Devon,

Last year on Valentine’s Day, slightly blue scones— made with blood oranges— appeared on your kitchen table. I thought I’d pick up where you left off. This morning, I threw together a blood orange and olive oil cake. Blood oranges are in season. And the fiery skinned fruits are all over the market stands.

These oranges were bursting with juice and color. The smell was completely intoxicating. I felt a bit wasteful using the juice to flavor my cake. It seemed much more appropriate to drink the sweet and slightly acidic juice. I called the still groggy eyed boy into the kitchen to share in the sweet flowery smell of freshly squeezed juice.

I have tried to keep kitchen equipment and utensils to the bare minimum. Not an easy task, given my love of smooth ceramic mixing bowls, enamel coated Dutch ovens, and silicon molds. I am now forced to be a bit more resourceful. This is how I ended up using my terracotta cazuela as a baking dish.

A traditional cooking vessel, the cazuela is used for just about everything: roasting, boiling water, stewing…the list continues. Baking a cake seemed a natural extension. The thick clay walls would act almost like an oven within the oven, insulating the cake nicely and providing even heat. I suspected that these same properties would result in a beautiful crunchy crust. (I was not disappointed).

In general, it is good practice to measure the capacity of the baking vessel before filling it with batter. I only wish I had thought to measure the capacity of my mixing bowl too! Half way through the recipe, I realized that it was not possible to mix the liquids and the flour in my medium sized bowl. A bit frantic, I had to press my aluminum pot into service.


Mixing the blood orange juice into the batter, I issued a silent prayer that my cake would not turn out that light blue color of your scones. I reread your post before starting for some advice. To try to avoid the blue effect, I mixed in tangy yogurt instead of lowfat milk. I hoped the acid from the yogurt would help balance the pH of the batter.

As I poured my gooey batter into my lightly oiled cazuela, I admitted my doubts aloud. My remarks were answered with an eager request to lick the sides of “mixing bowl.” The largest spoon in the house was plopped into the mixing bowl and handed over.

The cake emerged from the oven golden on top with a wonderful crusty edge. It was moist and light with the subtle orange flavoring. The cazuela baked the cake evenly and a bit surprisingly, released the cake easily and in one piece. I cut two generous slices and served the cake with a cup of strong dark coffee. My slice wasn’t quite generous enough and as I rose to cut myself another piece, a bright voice asked for a second slice even though there was still half a slice remaining on the plate!


Blood Orange Olive Oil Cake
Makes one 10 inch round cake or one 12-cup bundt cake

2 ¼ cup flour
1 tsp baking soda
1 tsp salt
1 cup sugar
2 tbsp blood orange zest and lemon zest
2/3 cup blood orange juice (roughly 3 oranges)
3 eggs, beaten
8 oz olive oil
1 cup yogurt

Preheat oven to 350 degrees F. Lightly oil the baking round. I used a 12-cup capacity baking dish. The recipe is styled for a 12-cup bundt pan or equivalent round cake pan.

In a large mixing bowl, mix together flour, baking soda, and salt.

Zest one blood orange and half a lemon. Juice three blood oranges. In a second mixing bowl, mix citrus zest and sugar. Whisk in three beaten eggs, olive oil, orange juice, and yogurt.

Pour wet ingredients into the flour mixture. The mixture will look a bit curdled but it will be fine. Gently whisk until combined. Transfer batter to the prepared baking dish. Bake for 1 hour to 1 hour 15 minutes or until a toothpick inserted into the center of the cake comes out clean.

Bake 1 hour to 1 hour 15 minutes.

Note: my baking time may vary from the standard metal baking dishes. Clay cazuelas generally take longer to heat up and probably take a bit longer when baking. I advise checking the cake at the 45-minute mark.

Tuesday, January 25, 2011

Mini Chocolate Walnut Cakes


Dear Devon,

I am not usually drawn to chocolate cakes. Sure, I enjoy the occasional bite of chocolate, and will never turn down an opened bag of peanut M&Ms, but in the end, I tend to prefer desserts without chocolate. So, it is a bit surprising that I falling into the world of chocolate obsessions.

The discovery of bricks of 70% chocolate has changed my world. Technically, the Catalans do not use this type of chocolate for baking but rather for their rich afternoon hot chocolate, usually taken with churros or melindros. Initially ignorant of this differentiation, I grabbed a bar for random snacking and occasional baking. It was a lucky mistake. Now I am embarking on a new adventure: chocolate desserts.

The chocolate is so rich that it needs something more to balance the heady chocolate flavor. I tried making this cake in a larger, traditional cake form with port-infused prunes. Delicious, but the prunes were lost in the smooth, rich chocolate flavor. Next, I tried adding grated ginger, but even 1 ½ tbsp of ginger could not stand up to this intense chocolate flavor. Perhaps the best alternative is nuts: walnuts, pistachios, or my personal favorite, hazelnuts. I set out this morning to try my theory. Will the addition of nuts bring my chocolate cake to a new level?


I was a bit too caught up in my lofty goal to make adequate preparations to ensure optimum success and low levels of stress. The truth is, no matter how large your kitchen, there is never enough counter space, the sink is full of dishes, or you need two whisks and can only find one. I was a bit frantic in the kitchen trying to pull this one together. But now, seated in front of my glowing laptop screen, chocolate cake by my side, I have almost forgotten that I splashed melted chocolate on my blue sweater and that I forgot to turn on the oven.

And even with my organizational challenges, I plan to add this recipe to my rotation. It is not a difficult recipe. It does not require an entire battery of bowls, knives, or whisks. But it does call for a bit of planning. In the end, the rich moist cake studded with creamy buttery walnuts, cloaked in the intense flavor of chocolate, will make the chore of scrubbing bowls seem insignificant.

Next on the list: Flourless Chocolate Cake


Mini Chocolate Walnut Cakes
Makes 6 small cakes or one large 9 inch cake

6 oz butter
4 oz chocolate (70% cacao)
2 eggs
1 tsp red port
¼ cup walnuts, chopped
½ tsp cinnamon
1/3 cup sugar
½ cup flour
¾ tsp baking soda
2 pinches of salt

Preheat oven to 400 degrees F. Butter and lightly flour muffin tin or cake pan. Set aside on a large baking sheet until ready to use.

Dice butter and coarsely chop chocolate. Set a heatproof bowl over a pot of simmering water. Add butter and chocolate to the bowl and gently melt, stirring occasionally to encourage even melting. Stir in port. When the mixture appears smooth and glossy, remove and set aside to cool.

Sift together flour, baking soda, cinnamon, and salt. Set aside until ready to use.

In a large bowl, whisk eggs for about 30 seconds, just to break them up. Gradually begin adding sugar, whisking vigorously until all the sugar has been incorporated. Whisk until the egg-sugar mixture is about double in volume, thick and a bit frothy. It should be a light lemon yellow color. Add flour in two additions, mixing just until the flour is incorporated. Fold in melted chocolate-butter mixture and 2/3 of the chopped walnuts.

Spoon batter into prepared pan. Sprinkle with remaining chopped nuts. Bake in pre-heated oven for 30 to 35 minutes or until a toothpick or cake tester inserted into the center comes out clean. Cool on a wire rack before serving.

Monday, October 11, 2010

Vietnamese Iced Coffee


Dear Devon,

Let me tell you how the Spanish day is structured:

8:00El desayuno: coffee, toast or croissant
9:00Arrive at work
11:00El cafecito: coffee, croissant, maybe a small beer
2:00La comida: 3 course lunch including beer or wine, dessert, and more coffee
5:00Return to work (from lunch that is)
6:30La merienda: coffee or beer and snacks (cigarettes, tapas, fried anything)
8:00Work day ends
10:00La cena or dinner

It seems the further south you travel, the less time you spend working and the more time you spend eating. But who am I to complain? Any tradition that tells me to eat two croissants in one day can’t be too bad.

The workday schedule above is not an exaggeration. I had a minor problem with my water service at the new apartment. Being a newly arrived American, I was extremely anxious to have the situation resolved, but knowing a Spaniard’s distinctive schedule, chose to call my landlord at midday, as opposed to at dawn. My landlord, a respectful and generous man, but distinctly Spanish, hurriedly told me to come to his office at 6 pm. Spanish people are never in a hurry, except at closing time or before meals. To call at noon and to meet at 6 pm seemed like a long wait. What I didn’t realize is that the day really begins at 6 pm. But less than an hour later, they take another break, so that thirty-minute window is essential to Spain’s economic future. Honestly, I don’t think I will ever be able to re-adjust to an American working schedule!

Given the amount of coffee consumed here in a single day, I have had to adopt a coffee habit. My favorite coffee is the cortado. With an espresso machine, steam is quickly shot through a disk of tightly packed grounds. Just short of a full shot, the steam is prematurely shut off and a splash of whole milk is added to the glass. The result is a thick, syrupy shot of espresso with the most heavenly, dense, frothy foam. Use a tiny spoon to vigorously mix in a bit of sugar (make sure you clank the sides of your glass loudly). Even if you don’t think you like coffee, the intoxicating fragrance of a cortado will reveal your deepest coffee fantasies.

Historically, I have preferred tea to coffee, but in hot weather, a good iced coffee can really hit the spot. I am partial to Vietnamese style iced coffees sweetened with condensed milk, which in Vietnam’s colonial period substituted for unavailable fresh milk. Vietnamese iced coffees have the same intense richness as cortados and are flavored with a hint of spicy chicory. The infused chicory gives the coffee a distinct aromatic character that is woody and tangy. The coffee brews in a small metal container that rests on top of an ice filled glass. The heavy condensed milk supports the lighter coffee, forming two distinct layers of liquid that require vigorously stirring to sufficiently balance the sweetness of the condensed milk to the dark and spicy undertones of the coffee.

Gathering together the requisite ingredients is usually the most difficult part in the brewing process. Sweetened condensed milk and the unique brewing filters can usually be found at an Asian grocery store. Chicory is a bit harder to find. Zabar’s sells chicory in individual containers and can pack it to order, so you can buy a ¼ pound instead of a full pound (which I recommend). Don’t buy your chicory mixed into whole coffee beans. It will ruin the beans if it is ground with them. Chicory is extremely fragrant, slightly bitter, and a bit overwhelming, so I suggest using it sparingly. On another important note, do not go crazy with the sweetened condensed milk, unless you have excellent dental coverage.


Vietnamese Ice Coffee
For 2 servings

One kettle of boiling water
2 metal Vietnamese drip coffee filters
½ tsp of chicory
2 tbsp of ground coffee (French roast)
2 to 3 tbsp sweetened condensed milk

A Vietnamese coffee filter has three parts: the lid, the canister, and an internal perforated disk that screws into the canister. A metal piece with a screw at the end extends from the perforated disk. To remove the disk, twist the screw to the left.

To prepare the filters, carefully unscrew the perforated disk and metal lid. Grind coffee beans until the size of quinoa. Spoon one tablespoon of ground coffee in an even layer into the base of the canister. Add a pinch (1/4 tsp) of chicory. Secure the perforated disk onto the canister, turning the screw until the coffee is tightly compressed between the disk and the base of the canister. Rotate the screw two full turns to the left. This step is really important. The disk must be loosened a bit to allow for the water to flow through the coffee grounds. If the disk is too tightly secured, the water cannot flow through the filter. Shake the canister several times over the sink, to release excess or undersized coffee grounds.

Bring a large kettle of water to a boil. Prepare two glasses. Pour condensed milk into each glass. Depending on how sweet you like your coffee, add 1 to 1 ½ tbsp of condensed milk. It is always easier to put in too little at first and adjust, than to put in too much and ruin the coffee. Top with ice cubes. Set the prepared filters over each glass.

Pour boiling water in a slow, steady stream into each canister. Stop at about a quarter of the way full. Wait about 20 seconds. If the water has flowed through, the filter must be tightened. The coffee should trickle out slowly. Continue adding the boiling water until the container is roughly three quarters full. The entire brewing process should take about 5 minutes.

Wednesday, September 29, 2010

Chocolate Chunk Hazelnut Coffee Ice Cream


Dear Devon,

Before you put away your ice cream maker for the season, you have to try my amazing recipe for chocolate hazelnut coffee ice cream. I don’t have a fancy name for my flavor like Ben and Jerry’s, so if you think of a better one, let me know. Besides coffee, I don’t go for the rich brown flavors like dulce de leche and rum raisin. Strawberry, peach, and pear are more my style. But every so often I get that craving for something a bit more decadent. Coffee ice cream always hits the spot, especially when laced with chunks of chocolate and crushed, toasted hazelnuts. Each spoonful is delectable. Smooth, coffee infused ice cream balanced against bitter morsels of dark chocolate and smoky, crunchy hazelnuts. I promise you, it’s a recipe you’ll want to repeat.

We have discussed methods for making ice cream several times. While you lean towards more unusual recipes like cornstarch gelato or almond milk bases, I prefer a more traditional custard base for my ice cream. There are a multitude of ice cream recipes, all vaguely similar. In my experience, I have found the most success with a one to one ratio of cream to whole milk mixed with five egg yolks. Cream based ice creams are overwhelmingly creamy, almost like eating a chilled, viscous flavored butter. And 100% whole milk ice cream lacks the luxurious decadence inherent to any good ice cream. Egg yolks impart body and richness, more like frozen custard than just frozen milk. I can’t stress enough the importance of whole milk and cream in ice cream. On this, you and I agree. It’s ice cream after all: If you want a healthy dessert, eat a pear instead.

Barcelona’s ice cream and gelato is addictive. The flavors are intense, pungent, and refreshing. The rainbow of fruit flavors is spectacular. Subtly flavored fruits like melon, fig, and peach are intensified. Fig ice cream goes beyond suggesting the taste of fig but actually embodies a more advanced stage of a fig’s growing process, from tiny seed to fruit to ice cream! I tried an incredible plum ice cream the other day and promise to keep you updated on any other unusual flavors. Still, I’m dying for my ice cream maker. Unfortunately, our tiny excuse for a freezer can’t hold a frozen pizza, let alone an ice cream workbowl. Así es la vida! I’ll have to content myself with the multitude of impressive ice cream shops.


Chocolate Chunk Hazelnut Coffee Ice Cream
3 cups half and half (or 1 1/2 cups whole milk + 1 1/2 cups cream)
5 egg yolks
2/3 cup sugar
2 tbsp decaf coffee beans
1/4 cup coffee (decaf)
1/2 cup toasted hazelnuts, skins removed and chopped
1-12 oz chocolate bar with hazelnuts (for extra nutty flavor)

In a large pot, bring half and half to a light boil over medium-high heat. Turn off the heat. Pour in decaf coffee and whole coffee beans. Cover with a lid and let coffee steep for 30 minutes. Fifteen minutes would probably be enough, but for a richer coffee flavor allow the beans to steep longer. After 30 minutes, the milk-cream mixture will turn a soft brown color. Remove and discard the beans.

Beat egg yolks with sugar in a large mixing bowl until pale yellow. Gradually add hot milk mixture to the egg yolks one ladleful at a time. Add about one third of the cream mixture, whisking the entire time. The egg yolks need to be slowly introduced to the hot cream, otherwise the eggs will cook and scramble. It's really unpleasant when this happens, and it ruins the texture of the finished ice cream. Combine the tempered egg yolk mixture into the remaining hot cream. Heat slowly over a medium low flame, stirring constantly with a wooden spoon until thickened. When the first bubbles begin to burst along the edges, test the custard for doneness. The custard is ready when a line drawn with your finger on the back of the spoon holds it shape. Transfer the pot into an awaiting ice bath to instantly stop the cooking. Pour the cooled mixture into a clean bowl and cover with plastic wrap, pressing the wrap onto the surface of the custard. Cool in the refrigerator for at least 2 hours, preferably overnight, before continuing.


Roughly chop toasted hazelnuts and chocolate bar. Set aside. Pour ice cream base into ice cream maker. Freeze according to your manufacturer's instructions. It should take about 25 minutes. At the 15 minute mark, add the chopped hazelnuts and chocolate. Continue to freeze. Using a rubber spatula, carefully scrape down the sides of the workbowl as the machine spins. This is a bit tricky, but it prevents the ice cream from freezing to the workbowl, giving you more delicious ice cream to enjoy. Remove finished ice cream to a container. Freeze for 30 minutes to an hour more before serving. I use a glass loaf pan with a lid. When storing ice cream, it is always preferable to store it in a container that allows for greater surface area exposure. It is supposed to affect the flavor of the ice cream. After reading this, I noticed that all ice cream shops store their product in long, narrow containers, so I started doing it too. It allows you to make perfect, rounded scoops for nicer presentation.

Monday, June 7, 2010

Favorite Brownies


Dear Michelle,

I have a long history with these brownies. They are the first thing I remember baking that I made of my own initiative, by myself, and for the first time. This must have happened some time in high school, because I remember making them for my 16th birthday when my parents invited some of my friends over for dinner. I thought I'd impress them with some awesome brownies, but unfortunately I forgot to add sugar! Since the chocolate used here is unsweetened, they were NOT good at all. I recently made them for the welcome bags we left for out-of-town guests at the wedding, and I did remember the sugar this time.


This recipe is from my mother's copy of The Joy of Cooking (I'm pretty sure the 1963 edition), which was the cookbook I felt most comfortable with through high school and college. I use my edition ('97) all the time; it is probably my most-referenced cookbook. The brownie recipe is pretty much the same, as far as the amounts go, but the instructions have been streamlined a little. At some point I decided to see how much chocolate I could add, and have increased the amount they use by 50%, from 4 oz to 6 oz. Any more than that, and something bad happens. I don't remember what, but considering how much I love chocolate, it was probably a textural problem instead of a too-much-chocolate problem.


These brownies are the best I've ever had; they are rich, chocolaty, with a slight crust on top and a very tender, but not quite gooey center. I might try making them with a little less sugar next time, but that's because I like the taste of sweet less and less, and tend to prefer my desserts richer instead. These never last long; if you want to save them for something, do not leave the pan out on the stove to cool! Best to make them when no one is around. Oh, and be prepared to lick the mixing bowl; I dare you to stop yourself.


Recipe scanned from my photocopy of my mother's book:


Monday, March 22, 2010

Linzertorte

Salut Devon,

I recently spent a lovely afternoon playing piano duets and baking with my lady friend, Gunhild. We had a great time, both at the keyboard and in the kitchen. She has one of those amazing apartments filled with sentimental objects: faded prints, colorful rugs, dusty books printed in German Gothic type, and best of all, a grand piano and a harpsichord. Her apartment is in a beautiful part of upper Manhattan near Fort Tryon Park. Happy squeals from the children in the nearby playground drift through the open window as our linzertorte quietly bakes.


I had tasted Gunhild's linzertorte many times and always found it delicious. I figured the recipe was in her Austrian blood. So, you can imagine my surprise when I saw that the recipe came from an old edition of the Joy of Cooking! My astonishment was even greater when she handed me a gleaming copper bowl and a wooden spoon. Gunhild came of age before the electric mixer was widespread. If generations of bakers managed to make linzertortes without it, I suppose I could, too, at least for one afternoon. I did loudly object when she instructed me to beat the butter for an hour. This was seriously hard work. Even with soft butter, the process is slow and tedious. Adding flour, chopped nuts, and eggs only increased the effort. As the process wore on, I could feel the burn in my shoulder and the kink in my neck. All I can say is: I love my electric mixer.

With our linzertorte batter cooling in the freezer, I took a much needed rest with a restorative cup of tea. Freezing really helped to bring the batter together. The room temperature butter had gotten a bit too soft and greasy. 20 minutes or so later, we pulled it from the freezer and began building the torte. The 9-inch round springform pan was brought out and filled with 3/4 of the batter. Next came a thick, dark, luscious layer of raspberry jam. Use good jam (and butter) for this recipe. It definitely makes a difference. In lieu of piping the decorative lattice on top, Gunhild dipped her fingers into a nearby bowl of flour and rolled out skinny coils of dough. After the fuss I made over the electric mixer, I think she was a bit self-conscious about her latticework, insisting that she needed a piping bag. But I disagree: I love the rustic, uneven look of the hand-formed lattice. The linzertorte went into the hot oven and we headed over to the piano.


With the pleasant afternoon and the delectable linzertorte lingered in my thoughts, I decided to try it on my own with an electric mixer. Though I had faithfully copied her recipe, I consulted my edition of the Joy of Cooking. To my surprise, the recipes are different. For better or worse, I'm not sure. But I take comfort in her well-worn recipe. A few substitutions were made. Hazelnuts for almonds, and the flavor of jam. Raspberry jam was low, so I combined it with a blackberry variety from my favorite Italian grocery store at the Chelsea Markets. Good jam is one of my must haves. I don't eat jam a lot, but when I do, I want it to taste like fresh fruit. Some jams tend to be more sugar than fruit, making them excessively sticky and a bit tart. In place of the springform pan, I pulled out a 13 inch rectangular tart pan that I've been dying to use.
The resulting torte can only be described in my dear friend Fatima's recent email:

I thoroughly thoroughly thoroughly loved that torte! It tasted like a cross between a pecan shortbread and sour cherry pie -- DELICIOUS! I can't even say I like linzertortes -- I pass them by every time I see them, but that one was so buttery, nutty, semi-tart, goodness...it was a gem of a treat, THANKS.


Linzertorte
3/4 cup butter, softened
1 cup sugar
2 eggs
1 tsp lemon zest
1 cup hazelnuts
1 1/4 cup flour, sifted
1/4 tsp cloves
1/2 tsp cinnamon
8 oz raspberry jam

Preheat oven to 350 degrees F.

Roast hazelnuts on a large baking sheet until fragrant. Using a large dishtowel, rub off the skins while the nuts are hot. Grind in a food processor. Set aside until ready to use.

Beat together sugar and butter until smooth. Beat in eggs, lemon zest, and ground hazelnuts. Sift flour, cloves, and cinnamon. Using a rubber spatula, fold in dry ingredients. Cool in the freezer for 20-30 minutes.

Let the dough come to room temperature. Spoon 3/4 of the batter into baking pan. Using an offset spatula or the back of a spoon, smooth out the batter into a smooth layer. Evenly, spread jam over the batter. With lightly floured fingers, roll remaining batter into long coils. Carefully arrange half the coils about 1 1/2 inches apart on the tart. Place the remaining coils on top at right angles to the already placed coils, forming a lattice pattern.

Bake until lattice is golden brown. 9 inch springform bakes for 50 minutes. 13 inch rectangular give 40-45 minutes.


I use the leftover batter to make butter cookies. Roll the remaining dough into small balls and place on a lined cookie sheet. Bake at 350 degrees for 10 - 12 minutes until light golden brown.