Tuesday, February 22, 2011

Pizza Dough

Dear Devon,

In recent weeks, my craving for a good slice of pizza has almost brought me to a standstill. I didn’t think I was the type who would miss a hamburger, everything bagels, and a crispy slice of New York pizza, but it turns out I am. My sister had asked me to post something on pizza. Renee is one of the few people in the entire world that I will indulge. Anyway, I wanted pizza.

My New York self six months ago must have anticipated that pizza would bring my daily routine to a halt, because I packed a photocopied pizza dough recipe from Cindy Mushet’s The Art and Soul of Baking. Although I had never tried this recipe, I have found success with many others from her book. Once I succeeded in converting English to metric, I was ready to start kneading pizza dough.
Mushet’s The Art and Soul of Baking is one of my all time favorites, but her dependence on the classic KitchenAid stand mixer disappoints me. I do not have the counter space, storage facilities, or the resources to call this irreplaceable tool my own. It would certainly be handy for making bread and whipping egg whites, but until I own that sprawling California kitchen, I’ll make do with good old arm strength.

After two anxiety attacks, I adapted the recipe to a non-mechanical process. A few practice rounds later, I streamlined the process, making fresh pizza dough a simple morning task.

Mushet’s recipe makes enough dough for 2 large pizzas. I highly recommend making the recipe in full. The dough is relatively easy to make and the results are fantastic. If you halve the recipe, which I did at first, you will regret it as soon as you finish that last bite. After dividing the dough into halves (or thirds, in fact), I make one pizza for the oven and wrap and seal the remaining dough in a ziplock bag destined for the freezer. Defrosting the dough is simple and takes only a few hours in the fridge. I also like to date whatever goes in the freezer. Sometimes, things go in and don’t come out. I don’t recommend eating that two-year-old lamb curry in the back corner of your freezer.

Fresh Pizza Dough
(adapted from Cindy Mushet, The Art and Soul of Baking, p. 77-78)
makes 3 pizzas

¼ cup warm water (110 to 115 degrees F)
2 ¼ tsp active dry yeast, or 1 ¾ tsp instant yeast
3/4 cup water
2 tbsp olive oil
3 ¼ cups bread flour or unbleached all-purpose flour
2 tsp salt


In a bowl, mix together yeast and warm water. Add a pinch of sugar and whisk until well blended. Wait five minutes until the mixture gets a bit frothy and milky. Add water and olive to the bowl, mixing to blend (as best you can). The mixture should smell like fresh yeast, sweet and pungent.

On a clean surface, dump out measured flour and salt. Loosely blend with your fingers. Pull the flour together into a roughly pyramidal mound. Make a large well in the center, pushing flour outwards to create a roughly 8-inch “bowl.”

Pour the yeast mixture into the center of the well. Using a fork, slowly incorporate the flour into the mixture, continuously whisking to get rid of any lumps. Continue adding flour with the fork, moving around the base of the flour mound. When the mixture becomes too difficult to mix with the fork, begin breaching the flour walls by adding flour from the top of the wall. Work quickly or the loose dough will run all over the board. Continue to add flour until a rough dough forms. It should be sticky, pungent, and roughly textured. Work into a lump and set in a bowl to rest for 20 minutes. Cover with a lint free cloth.

On a well floured surface, turn out dough. With floured hands, knead for 8 to 10 minutes. The dough should be smooth and elastic. Add more flour as needed. It is a fairly resilient dough. A touch more flour will not affect its final outcome. Set in a lightly oiled bowl to rise for 40 to 60 minutes. Cover with a lint free cloth.

At this point, the dough can be frozen or refrigerated for future use. If destined for the freezer, be sure to divide the dough into halves, wrap in plastic wrap and place into an airtight ziplock bag. Mushet says the dough will stay good up to one month in the freezer. I recently made an eggplant and olive pizza using the frozen dough. It turned out great, just plan a few hours for defrosting and you’re all set.

Monday, February 14, 2011

Blood Orange Olive Oil Cake

Dear Devon,

Last year on Valentine’s Day, slightly blue scones— made with blood oranges— appeared on your kitchen table. I thought I’d pick up where you left off. This morning, I threw together a blood orange and olive oil cake. Blood oranges are in season. And the fiery skinned fruits are all over the market stands.

These oranges were bursting with juice and color. The smell was completely intoxicating. I felt a bit wasteful using the juice to flavor my cake. It seemed much more appropriate to drink the sweet and slightly acidic juice. I called the still groggy eyed boy into the kitchen to share in the sweet flowery smell of freshly squeezed juice.

I have tried to keep kitchen equipment and utensils to the bare minimum. Not an easy task, given my love of smooth ceramic mixing bowls, enamel coated Dutch ovens, and silicon molds. I am now forced to be a bit more resourceful. This is how I ended up using my terracotta cazuela as a baking dish.

A traditional cooking vessel, the cazuela is used for just about everything: roasting, boiling water, stewing…the list continues. Baking a cake seemed a natural extension. The thick clay walls would act almost like an oven within the oven, insulating the cake nicely and providing even heat. I suspected that these same properties would result in a beautiful crunchy crust. (I was not disappointed).

In general, it is good practice to measure the capacity of the baking vessel before filling it with batter. I only wish I had thought to measure the capacity of my mixing bowl too! Half way through the recipe, I realized that it was not possible to mix the liquids and the flour in my medium sized bowl. A bit frantic, I had to press my aluminum pot into service.


Mixing the blood orange juice into the batter, I issued a silent prayer that my cake would not turn out that light blue color of your scones. I reread your post before starting for some advice. To try to avoid the blue effect, I mixed in tangy yogurt instead of lowfat milk. I hoped the acid from the yogurt would help balance the pH of the batter.

As I poured my gooey batter into my lightly oiled cazuela, I admitted my doubts aloud. My remarks were answered with an eager request to lick the sides of “mixing bowl.” The largest spoon in the house was plopped into the mixing bowl and handed over.

The cake emerged from the oven golden on top with a wonderful crusty edge. It was moist and light with the subtle orange flavoring. The cazuela baked the cake evenly and a bit surprisingly, released the cake easily and in one piece. I cut two generous slices and served the cake with a cup of strong dark coffee. My slice wasn’t quite generous enough and as I rose to cut myself another piece, a bright voice asked for a second slice even though there was still half a slice remaining on the plate!


Blood Orange Olive Oil Cake
Makes one 10 inch round cake or one 12-cup bundt cake

2 ¼ cup flour
1 tsp baking soda
1 tsp salt
1 cup sugar
2 tbsp blood orange zest and lemon zest
2/3 cup blood orange juice (roughly 3 oranges)
3 eggs, beaten
8 oz olive oil
1 cup yogurt

Preheat oven to 350 degrees F. Lightly oil the baking round. I used a 12-cup capacity baking dish. The recipe is styled for a 12-cup bundt pan or equivalent round cake pan.

In a large mixing bowl, mix together flour, baking soda, and salt.

Zest one blood orange and half a lemon. Juice three blood oranges. In a second mixing bowl, mix citrus zest and sugar. Whisk in three beaten eggs, olive oil, orange juice, and yogurt.

Pour wet ingredients into the flour mixture. The mixture will look a bit curdled but it will be fine. Gently whisk until combined. Transfer batter to the prepared baking dish. Bake for 1 hour to 1 hour 15 minutes or until a toothpick inserted into the center of the cake comes out clean.

Bake 1 hour to 1 hour 15 minutes.

Note: my baking time may vary from the standard metal baking dishes. Clay cazuelas generally take longer to heat up and probably take a bit longer when baking. I advise checking the cake at the 45-minute mark.

Friday, February 11, 2011

A Restorative Day Trip

Dear Devon,

The New York Times and various friends have relayed stories and photographs of trials by snow, rain, and cold. Images of slushy puddles and cars trapped in the snow only strengthen my resolve that winter does not have to be this way. There are places where winter is indistinguishable from fall or spring, and that suits me just fine.

Locals say this winter has been unseasonably cold. Two weeks of temperatures in the low 30’s hardly seem a hardship, but this city has only had one day of snow in 10 years. Sitting in the glow of the fading sun, I am completely secure in my decision to run away from New York, at least for a bit.


Friends of ours, tired of a dreary East Coast winter, decided to take advantage of our restorative locale and made the seven-hour journey over the Atlantic for an all too brief visit. They requested two things: fresh seafood and the beach. Though some leather- skinned locals have already started prancing around in the sand, at this time of year, a gust of sea breeze gives me goosebumps, so I suggest shoeless walks in the surf, clothes on.

We boarded an early morning train and made the short coastal trip to the lovely seaside resort town of Sitges. Standing on the platform in Sitges, the train continuing on its way to Tarragona, my shoulders relaxed as I drew in the crisp salty air. Sitges lay before us, bathed in the early morning glow of the Mediterranean sun. We quickly shed our Barcelona layers of hats, coats, and scarves and followed the promising sound of lapping waves. After an hour of strolling the beach, my pocket was full of shells. I was calm, a bit sun-kissed, and scouting out my lunch options.

Lunch happened on the boardwalk, under the shade of a sprawling canvas umbrella and in the company of idle old men and their sun-worshipping dogs. We feasted on local specialties, including thick slices of bread with tomato puree and Sitges’ classic salad of olives, brined codfish, and tomatoes. Next came a giant black pot of steamed mussels and clams in a garlicky, olive oil rich broth. Fervent discussion about seafood safety proliferated, as the boys eager to indulge in all the wonders of the Mediterranean insisted on prying open the tightly-closed clams. (Don’t worry, Mom, the girls won that battle). The entire meal was capped with a 24-inch pan of squid ink fideuà, a paella-like dish made with thin noodles. Purplish-black, peppered with baby squids, sticky and delicious, the fideuà left dark rings on our lips, stained our fingertips, and smudged the tablecloth. By the time lunch was over, we had drained a bottle of red wine mixed with two bottles of soda water.

Back in my apartment in Barcelona, even I have to return to reality, but this lunch memory will remain long after my tongue returns to its normal color.

Monday, February 7, 2011

Veal Chop with Wild Mushrooms


Dear Devon,

I traded you Alice Waters for Patricia Wells. With the number of cookbooks published every year, I am surprised that trading cards of superstar chefs have not yet been included in every issue of Saveur. Cookbook trading, or borrowing, in our case, is better than laminated cards.

Our cookbook swap is still affecting the way I think about food long after Patricia Wells’ Simply French returned to your library. You had dog-eared a recipe for veal chops with wild mushrooms and asparagus. In addition to Wells’ mouth watering writing and the luscious photograph on the facing page, your high regard for the recipe made me pay closer attention. I studied it and copied it down for later use.
I am not sure if it was the excitement of seeing crates of wild mushrooms, or the blood red loins of beef, but it wasn’t until I walked through the market a few weeks ago that I finally made Wells’ recipe. Of course I made some slight changes. I traded baby asparagus for leftover thin green beans and seasoned one side of each chop with herbaceous za’atar seasonings. Friends of mine brought this tasty mix back from their trip to Israel last summer, and I loved it so much I brought it to Barcelona.

My weekly meat consumption includes cold cuts and sometimes chicken, but in general, I am not a big meat eater. (I confess, I have a weakness for good hamburgers, which are a rarity over here). This was one of the best steaks I have ever eaten. The meat was perfectly cooked, pink and soft inside, but with a salty, herby thick crust. When the knife pierced the juicy meat, my mouth instantly began to water and nothing beats that satisfying crunch of a nicely crusted aromatics. The fragrant mushroom port sauce enhanced every bite, bringing out the sweet grassy undertones of the meat.

You will probably run to your bookshelf in search of her recipe. I wish I had a copy of her book here, so I could continue my dialogue with Ms. Wells. After the success of this recipe, I am eager to try more. I can’t believe I waited half a year to make this!


Veal Chop with Wild Mushrooms
Roughly adapted from Patricia Wells
(serves 2)

2 veal chops
2 tbsp za’atar seasoning
100 g wild mushrooms
2 handfuls of thin green beans
¼ cup port
1 tbsp butter

Let meat come to room temperature. Liberally salt and pepper both sides. Generously sprinkle za’atar spices on one side of meat. Gently pat into the meat. Set aside to rest for a few minutes before cooking.

Sear veal chops za’atar side up over high heat in a large sauté pan in a bit of olive oil. Once the meat has settled into the pan, avoid the temptation to touch the cooking meat. This will ensure a nice browned crust. Depending on the thickness of the meat (mine was ¾ of an inch), sear 5 to 7 minutes before flipping. Continue cooking over a medium high flame for an additional 3 to 5 minutes. I prefer my meat rare-medium rare, but I know many who prefer well done. In any event, cook the meat to your desired temperature. Remove from the pan and set aside on a warmed plate, then cover with foil or a dishtowel.

Over a medium flame, deglaze the pan with port and add the mushrooms. Gently cook the mushrooms in the reducing port sauce. Cook for five or seven minutes before adding thin green beans with their stems removed. Cook for an additional two or three minutes. Add a lump of butter and melt into the sauce.

To serve, top steak with mushroom port sauce. Serve with bread and butter and a green salad.

Tuesday, January 25, 2011

Mini Chocolate Walnut Cakes


Dear Devon,

I am not usually drawn to chocolate cakes. Sure, I enjoy the occasional bite of chocolate, and will never turn down an opened bag of peanut M&Ms, but in the end, I tend to prefer desserts without chocolate. So, it is a bit surprising that I falling into the world of chocolate obsessions.

The discovery of bricks of 70% chocolate has changed my world. Technically, the Catalans do not use this type of chocolate for baking but rather for their rich afternoon hot chocolate, usually taken with churros or melindros. Initially ignorant of this differentiation, I grabbed a bar for random snacking and occasional baking. It was a lucky mistake. Now I am embarking on a new adventure: chocolate desserts.

The chocolate is so rich that it needs something more to balance the heady chocolate flavor. I tried making this cake in a larger, traditional cake form with port-infused prunes. Delicious, but the prunes were lost in the smooth, rich chocolate flavor. Next, I tried adding grated ginger, but even 1 ½ tbsp of ginger could not stand up to this intense chocolate flavor. Perhaps the best alternative is nuts: walnuts, pistachios, or my personal favorite, hazelnuts. I set out this morning to try my theory. Will the addition of nuts bring my chocolate cake to a new level?


I was a bit too caught up in my lofty goal to make adequate preparations to ensure optimum success and low levels of stress. The truth is, no matter how large your kitchen, there is never enough counter space, the sink is full of dishes, or you need two whisks and can only find one. I was a bit frantic in the kitchen trying to pull this one together. But now, seated in front of my glowing laptop screen, chocolate cake by my side, I have almost forgotten that I splashed melted chocolate on my blue sweater and that I forgot to turn on the oven.

And even with my organizational challenges, I plan to add this recipe to my rotation. It is not a difficult recipe. It does not require an entire battery of bowls, knives, or whisks. But it does call for a bit of planning. In the end, the rich moist cake studded with creamy buttery walnuts, cloaked in the intense flavor of chocolate, will make the chore of scrubbing bowls seem insignificant.

Next on the list: Flourless Chocolate Cake


Mini Chocolate Walnut Cakes
Makes 6 small cakes or one large 9 inch cake

6 oz butter
4 oz chocolate (70% cacao)
2 eggs
1 tsp red port
¼ cup walnuts, chopped
½ tsp cinnamon
1/3 cup sugar
½ cup flour
¾ tsp baking soda
2 pinches of salt

Preheat oven to 400 degrees F. Butter and lightly flour muffin tin or cake pan. Set aside on a large baking sheet until ready to use.

Dice butter and coarsely chop chocolate. Set a heatproof bowl over a pot of simmering water. Add butter and chocolate to the bowl and gently melt, stirring occasionally to encourage even melting. Stir in port. When the mixture appears smooth and glossy, remove and set aside to cool.

Sift together flour, baking soda, cinnamon, and salt. Set aside until ready to use.

In a large bowl, whisk eggs for about 30 seconds, just to break them up. Gradually begin adding sugar, whisking vigorously until all the sugar has been incorporated. Whisk until the egg-sugar mixture is about double in volume, thick and a bit frothy. It should be a light lemon yellow color. Add flour in two additions, mixing just until the flour is incorporated. Fold in melted chocolate-butter mixture and 2/3 of the chopped walnuts.

Spoon batter into prepared pan. Sprinkle with remaining chopped nuts. Bake in pre-heated oven for 30 to 35 minutes or until a toothpick or cake tester inserted into the center comes out clean. Cool on a wire rack before serving.

Thursday, January 13, 2011

Botifarra and Onion Marmelade

Dear Devon,

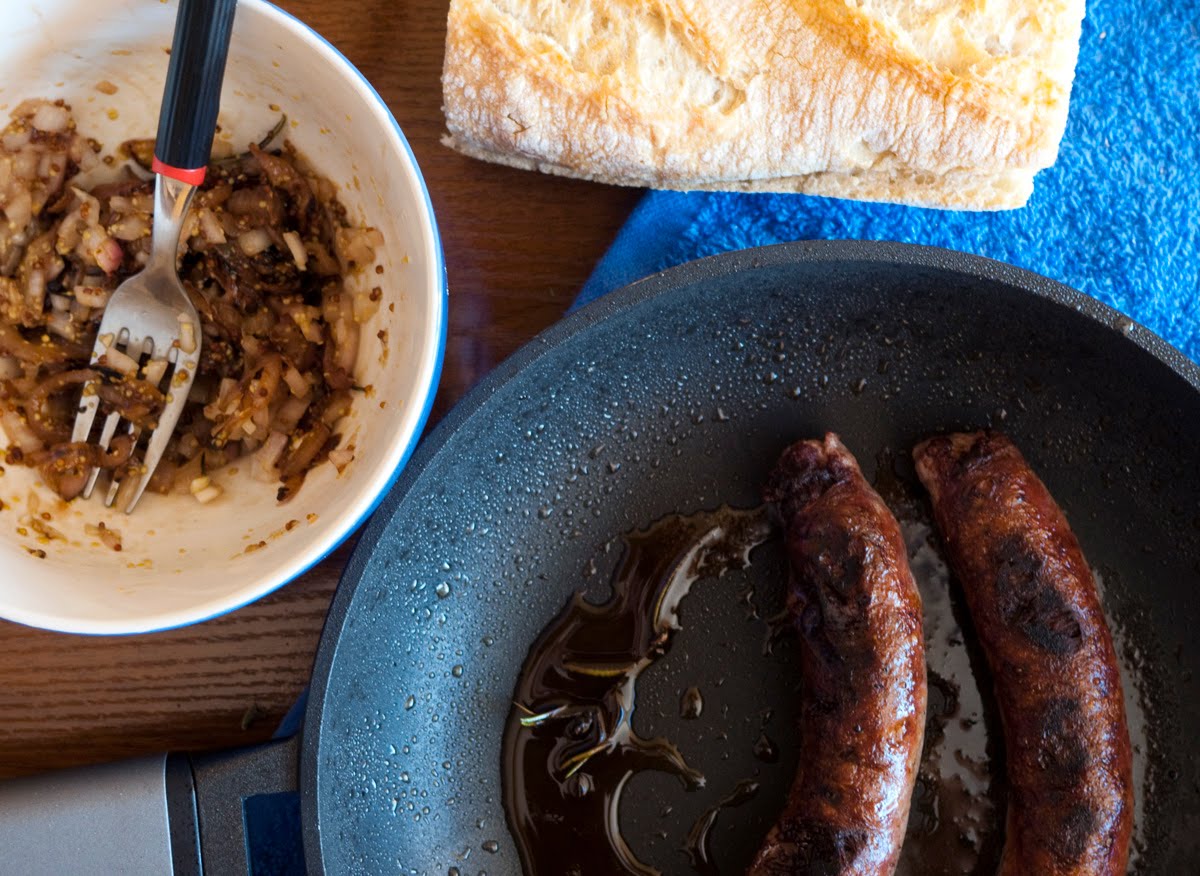
In early December, the Wall Street Journal published an article on botifarra, a traditional Catalan sausage made of ground pork and simply seasoned with salt and pepper. I was not surprised to see botifarra appear front and center on WSJ’s food page. I have been enjoying its rich and meaty flavor for weeks. One bite of this subtly seasoned sausage laced with black truffles will send anyone running to the butcher for more. I am especially fond of botifarra incorporated into tomato sauces or slowly braised with shredded cabbage. But my recent obsession has been in the form of a lunchtime sandwich. I pan fry the botifarra in a bit of olive oil. The links satisfyingly crackle and sizzled on the hot pan, the ends curl, and the skins crisp up nicely.


Found in every meat stall and butcher shop in Barcelona, botifarra at its most basic form is a lean pork sausage, without any of the trappings of luxury. Beyond this, the flavors are limitless ranging from the expected: wild mushroom, eggplant or basil to the wildly adventurous like pizza or chocolate flavors. It comes in four types: fresh, white (made with eggs), a black blood variety, and offal. I prefer fresh or botifarra blanca.

A sausage this good calls for a worthy condiment, something beyond bright yellow mustard or vinegary ketchup. I whipped up a quick dressing that I dubbed caramelized onion marmalade. It consists of sweet, golden caramelized onions mixed with fresh, crunchy diced red onions, a touch of spicy Dijon mustard, a splash of balsamic and a drizzle of olive oil. This marmalade was inspired by some of your creamy and tangy mustard sauces of lunches past.


Baguettes were sliced and toasted and smeared with a generous mound of onion marmalade. For “nutritional” value, I added a few pieces of leafy greens. The just-cooked through botifarra was eased on top, tucked into the lettuce and onions and topped by a second piece of toasted baguette.

For both our sakes, I will forgo tasting details. It would be too tortuous. Let’s suffice it to say that I will be enjoying this for lunch again soon.


Onion Marmalade
1 medium-sized red onion, thinly sliced
¼ cup red onion, small dice
2 sprigs rosemary
1 tbsp olive oil
3 tbsp port wine
1 ½ tbsp Dijon mustard
1 tsp balsamic vinegar
1 tbsp olive oil

2 sausage links (botifarra, if you can find it)
1 large baguette
lettuce

In a medium-sized skillet, heat 1 tbsp of oil. Add onions and rosemary sprigs and turn heat to low and slowly carmelize onions, 15-20 minutes. Throughout the carmelization process, add a touch of port to the onions to prevent scorching. When the onions are evenly browned, take off the burner and allow to cool.

While the onions are cooling, finely dice red onion, place into a medium sized mixing bowl. Add cooled carmelized onions, Dijon mustard, balsamic vinegar and olive oil. Mix thoroughly. Set aside for 10 minutes before serving.

In a non-stick skillet over high heat, cook sausage, roughly 7-10 minutes. The skin should bubble up and be a bit charred.

Halve baguette. Using a serrated knife, slice lengthwise. Spread a generous spoon of onion marmalade onto the bottom slice of each halved baguette. Top with lettuce and sausage. Place remaining slice of bread on top to close the sandwich.

Tuesday, January 11, 2011

Eggs over Bacon-Infused Croutons

Dear Devon,

If you haven’t already guessed, one of my biggest anxieties is an empty kitchen. Normally, my kitchen is never in such a barebones state that this should be a worry, but a fridge without eggs or milk is empty by my standards. Given the Spanish penchant for holidays, I am never sure when the market will be opened or closed. I had planned a short midweek vacation before the holidays. I did a whole round of grocery shopping before leaving just to be safe.


My list included fresh bread. Nothing beats the smell or taste of fresh bread. But, unfortunately, it has drawbacks, namely preservation. Generally, this is not a problem, but this time I was gone for three days, leaving my bread on the counter. I returned home to a rock hard loaf. I now understand how recipes like bread pudding, croutons, and panzanella originated.

I pulled together a quick breakfast, by frying cubes of the hardened bread in a bit of bacon-infused olive oil. Onions and rosemary were tossed in for some extra flavor and a bit of warmth. Crispy fried eggs topped this savory mountain of old bread. I was careful to keep the yolk loose. I wanted the broken, gooey yolks to ooze into the crannies of the hardened bread. It’s a little messy but definitely worth the clean up.


Eggs over Bacon-Infused Croutons
(serves 2)

½ loaf of stale bread
2 slices of thick bacon
1 small onion, sliced
1 sprig dried rosemary
1/3 cup to ½ cup olive oil
2 eggs

With a heavy knife, dice hard bread. Be careful with your fingers. I found cutting through the bread a bit scary. Fry chopped bacon in a sauté pan. Remove the browned pieces of bacon from the pan and set aside. Add a touch more olive oil, about ¼ cup of fat, including bacon fat. Gently fry cubed bread in oil. Sprinkle in dried, crushed rosemary leaves. Drizzle with olive oil as the bread cooks to encourage even browning and flavoring. The bread will soften as it soaks up the fat and eventually begin to toast up into crunchy morsels. Add sliced onion and cook until translucent. At the end, toss in the bacon. Remove the entire mixture to an awaiting bowl. In the same pan, fry eggs sunny side up.

To serve, scoop out a generous spoonfuls of toasted bread mixture onto a plate or bowl.

Note: I avoided salting this dish, as the bacon is already quite salty.