Showing posts with label recipe. Show all posts

Wednesday, March 30, 2011

Clarified Butter and Ghee


Dear Michelle-


Those eggs sounded so good that I made soft-scrambled eggs and toast for breakfast today. I added a creamy blob of butter halfway through, and some rosemary salt from The Meadow in Portland on top. It was amazing. I love the table cloth you are using in the photos of the eggs!


I've been on a diet of sorts the past two weeks or so. It's not a losing weight diet, but the cleansing sort. It is designed to be easily digestible, to reduce the amount of energy the body puts into dealing with digestion and daily elimination of toxins, which leaves more energy for eliminating built-up toxins and inflammation. Exciting, huh? Just wait! Not allowed is any grain with gluten, refined sugar, alcohol, caffeine, soy, or any animal products besides chicken meat (apparently very easy to digest--who knew?) and Indian clarified butter, ghee.


As you can see, there's not much variety called for in the diet, but it's not supposed to be about gastronomy. This was perhaps the hardest thing for me to deal with. My daily diet consisted of oatmeal with applesauce (unsweetened, organic) in the morning, and lunch and dinner were servings of kichadi, a mixture of spices with mung beans, rice, and vegetables. It wasn't so bad, and I found a spice mixture that was to my liking, but there's no way to get around that kichadi=mush. The things that made it more exciting were an allowance of chutneys and ghee. I bought a couple of chutneys, whipped up an additional easy apple-apricot-ginger chutney, and have made two batches of ghee.


I thought until recently that ghee and clarified butter were one and the same, but that's not the case. Butter is made up of three things: fat, water, and milk solids. Clarified butter is just the fat; ghee is the fat after the milk solids have toasted a little, lending to it a delicious nutty flavor and a gorgeous golden color. The advantage to using this "purified" butterfat over regular butter is that it does not burn as easily, so it can be used to impart a buttery flavor to foods in which you'd otherwise have to use oil. I don't know if this technically means that ghee has a higher smoke point than butter does, but the milk solids present in butter do burn before the oil does.


Ghee is also okay to eat for those people who are sensitive to dairy, a big treat if you have otherwise been avoiding butter. I know that there are supposedly good butter replacements out there, but let's be honest here for a minute--all things being equal, would anyone choose margarine over good, old fashioned butter?


Because the milk solids and water have been taken out, all clarified butters have a longer shelf life than regular butter does. One can see why that would be so valuable in a hot country like India, so it is not surprising that ghee has a sacred role in some Hindu rituals, as well as a hymn dedicated to it. It is much used in Ayurveda, traditional Indian medicine. 


When making clarified butter or ghee, it is important to start with organic butter. I was told once that added hormones accumulate in the fat of animals, and that was enough to keep me buying organic butter. Though I do not buy organic across the board, I am careful to only buy organic dairy, eggs, and meat. 


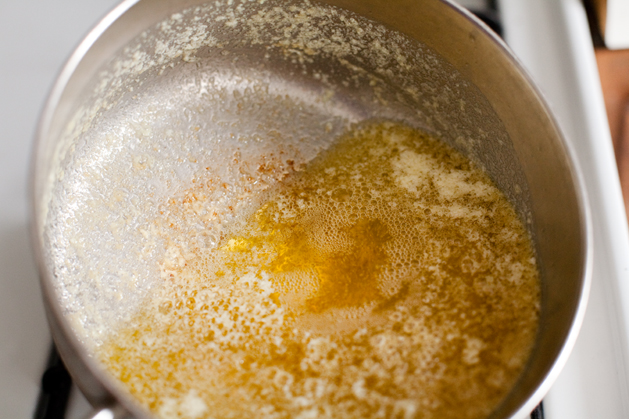
Making ghee is pretty easy. So easy, in fact, that I don't even need to write out a real recipe. Put butter in a deep pot. I used a pound, and most sites say that you'll lose about a quarter of volume in the process of cooking. Heat the pot on very low. The butter will melt, then develop film. It will pop and sputter, and fill your kitchen with a heavenly scent. The film on top becomes harder (this can be skimmed, I don't bother), and some milk solids will fall to the bottom of the pot. Once the popping and sputtering stops, about a half hour in, you have clarified butter. If you want to make ghee, watch the pot closely at this point; you want the milk solids on the bottom to brown lightly, BUT NOT TO BURN. Once browned and toasty-smelling, pull from the heat. The easiest way to decant this is to line a strainer with cheesecloth and poor through to a medium sized mason jar. This should hold indefinitely in the fridge. Below are photos of the various stages that butter goes through to clarify. I'd recommend cooking it in a large enough pot that the uncooked butter covers most of the bottom of the pot; I made some ghee recently that burned before it had stopped popping, I think because the melted butter was too shallow.




Tuesday, November 30, 2010

Curried Turkey Salad


Dear Michelle,

Happy Thanksgiving! This could easily be called, “What to Do with Your Turkey When You Don’t Want to Eat Turkey any More”. I love Thanksgiving, it might be my favorite holiday; I cherish the traditions, time with friends and family (my cousin James joined us this year!), and of course the food. The thing is, I’m not really the biggest fan of turkey. Sure, I’ll eat it, but when it comes time for seconds I’d rather have stuffing and mashed potatoes drenched in gravy, and some green beans for good measure. Any room that extra turkey would have stuffed into would be better filled by pumpkin pie.

Nor am I the only person in my family who feels this way; my father complains about the very existence of the turkey every year. Traditionally I like leftover turkey sandwiches in the days following the holiday, but this morning as I stood at the counter and stripped that poor bird’s carcass of everything edible before throwing the rest into a stockpot, I thought I’d try something a little different with the seemingly enormous amount of meat I scavenged, and make a turkey salad.


You’ve probably had curried chicken salad before. I’ve seen many iterations, most of the best involving grapes or apples, walnuts, and celery. Some are delicious, some only ok; it’s probably luck that I’ve never had one that was outright bad. I decided to use as additions items we had in the pantry/fridge: dried cranberries, chopped celery, parsley, and toasted pecans, for a true Thanksgiving turkey salad.

The secret ingredient in the dressing for this is my Aunt Lynaire’s curried apricot ketchup. Really, it’s Food and Wine’s recipe, but it came to me via my aunt, whom I’ve already mentioned is an extraordinary cook. I made my first batch of this on a whim several months ago, and again recently, and then again last night for my parents, to go with sweet potato fries. This stuff is really good, and pretty easy. Melted onions, dried apricots, and chopped ginger and tomato simmer in cider vinegar, water, and brown sugar, then puree to a sweet, sour, delectable sauce.

So I had a bunch of this stuff in the fridge, and I figured I might as well use it instead of starting from scratch. Jeff has a visceral aversion to mayonnaise, so I made two versions of the dressing, one with mayo and the other with sour cream. When I was trying to tell him which was which I couldn’t really tell the difference, so in this case I think the two are interchangeable. They both tasted really good!

Everybody liked the salad, but the best recommendation comes from He Who Groans at the Sight of Turkey, who said that if I did the same to the rest of the fowl leftovers, he would eat it all with pleasure.

Curried Turkey Salad


This would be just as good with chicken, and I’m sure very good with pork loin. Terrific in a sandwich with lettuce and cranberry sauce. Unless you know how hot your curry is, add in small increments and taste, or you might get a spicy-hot surprise. If you don't want to go to the effort of making the ketchup, try improvising with vinegar, store-bought ketchup, apricot jam, ginger and garlic- mix together until it tastes good, and add to mayo.

4 c chopped cooked turkey
1 1/2 c diced celery
1 1/2 c dried cranberries
1 c toasted pecan pieces
1 c curried apricot ketchup
1 c mayonnaise or sour cream
1-2  T curry powder
3 T chopped parsley


Mix wet ingredients with curry. Add turkey, etc. and mix. My family tends to like things on the condiment-heavy side; you might want to start with a little less than all of the sauce and then add more if you find it necessary.


Curried Apricot Ketchup, verbatim from my Aunt's recipe

Worth making just to have in the fridge. I’ve so far used it on fries, burgers, and hot dogs, but I’m willing to bet that I’ve only scratched the surface of its usefulness; I’m eager to try it on pork, potatoes, cauliflower- I could go on. I used an immersion blender instead of a standing blender, and it worked just fine.

1 t vegetable oil
1/2  c chopped onion
1 t finely grated ginger 
1 garlic clove, diced or grated
1/2 c chopped dried apricots
1 large tomato, peeled, seeded, and chopped
1/2 c apple cider vinegar
1/2 c water
1/2 c sugar (I used brown sugar)
1 t Madras curry powder (see above!)
salt

In a medium saucepan, heat vegetable oil. Add the onion, ginger and garlic and cook over low heat, stirring occasionally, until softened, about 10 minutes. Stir in apricots, tomato, cider vinegar, water, sugar and curry powder. Simmer over moderately low heat until the apricots are soft, about 15 minutes. Scrape the contents of the saucepan into a blender and puree until smooth. Season the ketchup with salt and transfer to a bowl. Refrigerate until cool, about 20 minutes. Serve at room temperature or chilled. 

The ketchup can be refrigerated for up to 2 weeks.


Friday, November 19, 2010

Concord Grapes 1: Peanut Butter and Jelly Cookies


Dear Michelle-

I think that might be more of a question for my father than McGee; I consulted On Food and Cooking and the matter of light and capsicum color is not addressed. I'd guess they were picked unripe and ripened naturally, perhaps with help from the heat of any sun that hit them, or the confines of the plastic bag? I'll be sure to ask the ol' pater familias next time we speak.


You're missing Concord grape season on this side of the pond. I've never been overtly aware of them until recently, when my friend Ashley reintroduced me. She offered me some as she was eating them at work, and when I exclaimed over the intensity of their flavor she gave them to me. I guess they were a little strong for her, but since they came from her CSA share and all of her roommates were similarly averse, she felt duty-bound to eat them. I couldn't believe anyone wouldn't be immediately addicted to the vibrancy of this flavor! I happily accepted and made some quick refrigerator jelly with them that evening. Then, I got to thinking about how good they'd taste with shortbread and peanut butter (grape jelly and PB being such a classic combination), and the rest was a foregone conclusion. I invited Ashley over to make cookies, a nice way to spend an early Fall weekend afternoon.


These aren't the prettiest cookies, nor are they the easiest to make; but they are really, really good. The jelly is bright and tart, the peanut butter marries with it perfectly, and buttery crumbly shortbread is just the right vehicle. The jelly was easy enough to cook up, as I didn't bother with making a perfect, glistening, clear jelly.


I cooked the grapes until they burst, pushed it all through a strainer to get every ounce of flavor out, added enough sugar to make the mixture sweet-tart, and simmered some more till it passed the jelly test. Then I made my "confection" peanut butter mixture of, you guessed it, peanut butter, mixed with almond flour (I'm sure peanut flour would work, if one can find it), confectioner's sugar, and salt. These additives make the peanut butter more workable, and less sticky. I was inspired by the interior of a Reese's PB cup. You know how when you get "natural" peanut butter cups the filling never tastes as good? I think straight peanut butter is too oily, and does that thing where it coats the mouth, which keeps it from properly combing flavors with whatever else might be intended.


I tried these out with both shortbread from Bittman's How to Cook Everything and a standard sugar cookie recipe. Where that came from doesn't matter, as the shortbread won the taste tests! It was more delicate, and complimented the flavors of the filling better. It even made a prettier cookie (in the photo of complete cookies on the plate, all excluding the leftmost were made with sugar cookie dough--the rest of the shortbread cookies were long gone by then). I am very fond of the shortbread recipe in the Williams Sonoma Cookies cookbook, but that shortbread tends to be really crumbly and delicate, and so I thought I'd give Bittman a chance. I'm glad I did.


Ashley and I cut, rolled, dolloped, and very carefully pressed the little cookie "pies" together, then chatted and drank tea (and then wine) while we waited for the test cookie to come out. It's a lot more fun with help! We also ate a LOT of cookies. Ashley left with a bag full to share with her roommates, a thank you for sharing their grapes, and I was glad there were fewer of these addictive little morsels in my apartment!


Concord Grape and Peanut Butter Cookie Sandwiches (or Pies)

shortbread cookie dough (see recipe below)
Concord grape jelly (recipe below)
peanut butter mixture (below)

Make shortbread dough and jelly. This can be done the night before, and refrigerated. I'd recommend this, in fact, as breaking up the work makes it more manageable. Preheat your oven to 275F. Roll out dough about 3/16" thick, and  cut out circles (or squares, I guess, if you'd rather), placing on a silicone cookie sheet liner or ungreased baking sheet. Dip your finger or a brush in water and wet around the edge of the dough. Roll a ball of the peanut butter mixture and squash down in the middle. Dollop some jelly on top. VERY CAREFULLY ease another circle of dough on top and pinch firmly down around the outside. It might take a cookie or two to get the amounts right, so it doesn't ooze out when you put the top on; you can use the above photos as a guide for proportions. Bake for about 30 minutes. They should be tinged with gold around the outside.


Shortbread (from How to Cook Everything by Mark Bittman, pg 898) directions paraphrased

1/2 lb unsalted butter, softened
3/4 c sugar
1 egg yolk
1 1/2 c all-purpose flour
1/2 c cornstarch
pinch salt

Mix flour, cornstarch, and salt together in a small bowl. In a larger bowl, mix butter and sugar with an electric mixer on low till just combined. Still mixing, add the egg yolk, then the flour mixture, and mix until the dough just barely holds together. This should take a few minutes.

Wrap in plastic and smash into a disc. Chill at least 30m. See above recipe, or if just making shortbread, follow the below instructions:

Heat oven to 275F.
Roll out on a lightly floured surface to 1/4 inch thick. Cut out shapes and place on an ungreased baking sheet. Bake until firm but tender and not browned, about 30m. Cool on sheets before moving to a rack.


Peanut Butter Mixture

peanut butter
almond (or peanut) flour (I've found ground pistachios work well also)
confectioner's sugar
salt

Start out with about a half cup or so of peanut butter. I use the natural kind, and have to stir it all together. Add about 1/4 cup (starting out) of nut flour, a few T of the sugar, and a pinch of salt. Mix thoroughly. Test: you want to be able to pinch off a piece and roll it into a ball without it sticking. Taste: it should be salty, creamy, crunchy, and not too sweet. If it needs more body (too creamy still), add more nut flour, 1T or so at a time. Adding additional powdered sugar helps it stick together, but too much and it will be too sweet--remember that is is already going inside a cookie!


Fast Grape Jelly

at least 2 cups Concord grapes
sugar

Heat the grapes in a saucepan (they should not fill it more than 1/4; the fruit will expand in volume as it boils) over low heat until they start to release skins. Simmer on low heat 10-15m, to get all of that good flavor out. Press through a sieve or a food mill (I bet this would work best), squeezing out as much juice as possible. Return liquid to heat, and taste. Add sugar as necessary, remembering to keep it a bit tart as a contrast to the richness of the peanut butter and the cookie. Simmer another 10m or so, and then do a jelly test: take a spoon and put a few drops of the jelly on it. You can either put it in the fridge or leave it out a few minutes; either way, you want it to cool. When it has reached the proper concentration, the cooled result will have gelled onto the spoon, and will not be runny. I took this even further and really boiled it down, but I went too far--it was almost the consistency of "fruit snacks" when it cooled, and had to be warmed up again so we could work with it!

You could probably doctor up store-bought grape jelly by boiling it down a bit and adding some lemon for additional tartness if you didn't want to bother with making your own jelly, or wanted to make this out of season. If you try this, let me know how it works!

Thursday, October 14, 2010

Hungarian Goulash with Poppy Seed Dumplings


Dear Michelle,

New York is at its best right now, but I'd trade cities with you in a second. Who needs a food processor when you have such incredible ingredients! I can't wait to hear about it when you start cooking.

Though today was beautiful, we had a cold spell last week, and I was moved to make goulash. I make it at least once a year now, but happened upon it by accident. Maybe five years ago I was making a birthday dinner for my friend Kate, and asked her if she had any requests. She said that her favorite Winter dinner was goulash, and I agreed to make it, never even having had it before. I came home after work and did the shopping, started the stew right away, drank some of the left over beer and thought, "this does not look very good." My dutch oven was full of onions and peppers, beer, meat, and a full half cup of paprika. It was all very. . . red. It smelled of raw onions and peppers, and seemed to be overwhelmed by the paprika.


We didn't eat that night till very late, and by that time I no longer doubted Kate's choice of birthday dinner. The meat fell apart, the onions and peppers melted, and the rich, spicy, smokiness of the paprika pervaded the stew, bringing it all together. We ate this deep red savory deliciousness over egg noodles tossed with butter and poppy seeds, as per Kate's request. I was won over.


Now every year when Winter descends and the windows close, I wait for the radiators to turn on and start thinking about what needs to cook for a long time in the stove or the oven, and I think of goulash. This year I tried a mix of pork and beef stew meat, and I've decided that beef works best. I did add a smoked trotter (pig's foot or ankle; a ham hock would work too) for some extra flavor and gelatin, to make the stew really glossy. I've made the mistake before of using mostly hot paprika, and I'd advise against it unless you're one of those masochistic people who eats hot sauce by the gallon. I also tried making dumplings instead of noodles, with success.


I think paprika is produced in Spain, as well as Hungary, so you should get some! I bet chorizo would be an amazing addition to this dish.


Hungarian Goulash with Poppy Seed Dumplings, '97 Joy of Cooking, not verbatim

Notes:

A smoked trotter or ham hock tossed in works well. I've tried just beef stew meat and a mix of beef and pork, and I think just beef works best. The last time I made this I only used 2lbs meat and the same amount of vegetables, but for carrots which I increased. I've always used beer instead of wine, and beef instead of chicken stock. GO EASY ON THE HOT PAPRIKA. Seriously. It is really easy to make this too hot. Start with all sweet, then add more for extra heat later if you like. The JOC calls for the caraway to be added with the rest of the herbs/spices, but I think I read somewhere that it becomes bitter if cooked too long, so I add it at the end. The first taste I had of the dumplings I thought they were a bit paste-y, but they quickly became addictive. Egg noodles are also a classic pairing, with poppy seeds and butter. I've never used the sauerkraut, or the sour cream, but I bet both are delicious.

4 oz bacon, smoked ham, or Hungarian paprika sausage, diced
3 lbs beef chuck, or half beef, half pork or veal shoulder
3 c thinly sliced onions
6 cloves garlic, chopped
1/2 c (2 oz) sweet Hungarian paprika, or a mix of sweet and hot
3 bell peppers, diced
1 c diced carrots
1 T dried marjoram
1 t caraway seeds
1 t ground black pepper
3 bay leaves
2c beef or chicken stock
1 c dry white wine or beer
1 lb sauerkraut, drained (optional)
1/4 c tomato puree, or 2T tomato paste
1/2 - 1 c sour cream or creme fraiche (optional)

Make sure everything is chopped, etc.- this makes the process easier. Brown the bacon or whatever in a Dutch oven, then remove to a plate or bowl. Pat stew meat dry, season with salt and pepper, and dredge in flour, shaking off the excess. Brown in batches in bacon fat, making sure not to crowd the pot. Add oil/fat as needed; the flour tends to soak it up. Remove as it browns to a plate.

Add onions to pot, and cook till soft and lightly browned (you could go further towards caramelizing if you like). Add garlic and peppers and saute till just soft. Add tomato paste and cook a few minutes, then stir in carrots and all herbs but caraway. Add liquid, scraping up the burned bits on the bottom. Add sauerkraut if using. Cook on stovetop or in oven at 300F for several hours, until meat is fork-tender. Stir in caraway. Add dumplings (recipe following), or serve over egg noodles tossed with butter and poppy seeds, or rice. If using sour cream, stir in at the last minute.

Poppy Seed Dumplings

2c flour
1T baking powder
3/4 t salt
3T poppy seeds
3t butter
1c milk

Bring milk and butter to a simmer on the stovetop. Meanwhile, mix together dry ingredients in a large bowl. Add simmering liquid to dry ingredients, stirring with a fork or kneading by hand until the mixture comes together. Divide dough into 18 dumplings. Roll each piece into a rough ball. Gently lay dumplings on top of stew and let simmer for 10m.

Tuesday, August 31, 2010

Tomato Confit


Dear Michelle,


There are few pleasures as simple or as anticipated as the first ripe, sun-warmed tomato of Summer. Cut into thick slices, sprinkled with salt, and drizzled with olive oil, the first juicy, melting, dripping bite of fruit signifies to me the end of Spring more than heat, ice cream, or sandals. It is something I look forward to every year.


But, then, there comes a time when one is ready to turn those tomatoes into something else; after all, they are very versatile, and even the best tomato salads get old when eaten every day. And, of course, there are some people who don’t like raw tomatoes. Who knows what’s wrong with them, but I suppose we must account for all tastes.


Here is a recipe to satisfy those people, and others who didn’t even know they were ready to move beyond the perfection of a good vine-fresh tomato. This is not a roasted tomato, but one that is gently melted, the flavor condensed and intensified. The slices or halves (depending on what kind of tomato is used) are cooked at a very low heat with herbs, oil, salt and pepper, garlic if you wish, until they slump into a flavorful concentrate that you’ll want to eat right off of the baking sheet.


Wells uses plum tomatoes in her recipe, but I’ve used all sorts. It is too difficult to peel smaller tomatoes, and I don’t always bother to seed them either, though my (spoiled) father will complain when I skip this step. Regular, large tomatoes should be cut in ½-3/4 inch slices. The peel will come off after cooking. I rarely bother with the garlic, unless I’m using larger tomatoes, and instead of thyme I’ll often use herbes du provence. These, especially the smaller tomatoes, can be cooked further for a chewier texture, but if you go too far you will end up with something closer to sundried tomatoes. Not the worst problem to have, for sure.


You’ll find many uses for these, not the least as a way to store extra tomatoes if you have a surplus. My parents freeze the confit to enjoy in the colder months. Tomatoes prepared this way have many uses. You can:


Puree them for a pasta sauce; mix with equal parts finely chopped artichoke hearts and olives, adding oil and vinegar to taste, as a tapenade (I made sandwiches with this and goat’s cheese one night for dinner); pizza, where they are much better than fresh tomatoes; added to omelets; tossed into a pasta salad; you get the idea.


Patricia Wells’ Tomato Confit (recipe copied verbatim)


2 lbs plum tomatoes, peeled, cored, seeded, and quartered lengthwise

Fine sea salt and freshly ground pepper to taste

A pinch of confectioner’s sugar

2 sprigs of fresh thyme

4 plump, fresh garlic cloves, peeled and slivered

2 Tb extra-virgin olive oil


1. Preheat the oven to the lowest possible setting, about 200F (90C; gas mark 1).

2. Arrange tomato quarters side by side on a baking sheet. Sprinkle each side lightly with salt, pepper, and confectioner’s sugar. Scatter the thyme leaves over the tomatoes and place a garlic sliver on top of each quarter. Drizzle with olive oil. Place in the oven and cook until the tomatoes are very soft, about 1 hour. Turn the tomatoes, baste with the juices, and cook until meltingly tender and reduced to about half their size, about 2 hours total. Check the tomatoes from time to time. They should remain moist and soft. Remove from the oven and allow to cool thoroughly.

3. Transfer the tomatoes to a jar along with the cooking juices and oil. Cover securely and refrigerate up to 1 week. Use in salads, on sandwiches, for pasta, or anywhere you want a rich, pure, tomato flavor.

Saturday, August 28, 2010

Almond Milk

Dear Michelle,


I’ve made my own almond milk. Why, you might ask, have I done this, something rather unordinary and perhaps for many people, unappetizing?


The idea started when you and I were talking about making almond-milk ice cream. I try to keep my dairy intake to a minimum, for several reasons. The most interesting of these is that I find I do not get as hot in the Summer sans dairy, which is a very good reason to abstain here on the steamy East Coast. I didn’t drink much milk before I discovered this, and obviously, I still do eat some dairy, but I’m always looking out for a good substitute.


After trying several different cowless sorts, almond milk is the most satisfying. It has a creamy texture and a mild but not bland flavor. Unsweetened is just sweet enough. However, not all almond milks are created equal. I’ve found I like Almond Breeze (original, unsweetened) the best, and I actively dislike the Pacific brand. I suspect that when you did not like the almond milk ice cream you once tried to make, this small distinction was the culprit.


I’d already been considering trying to make a cornstarch gelato with almond milk when we had that talk. Then, as frequently seems to happen in this city, someone mentioned to me a cafe in the East Village that supposedly makes remarkable homemade almond milk. I thought about it, looked online at various “recipes” (they’re barely even that), and decided I’d try it out.


WOW. This stuff sure beats what you can buy; it’s creamier, and has a finer, more delicate but also more pronounced almond flavor. The process is easy, consisting of soaking almonds overnight, slipping them out of their skins, blending them with water, and squeezing as much of the resulting liquid out of the ground almonds as possible. These leftovers can be reprocessed with more water, with a resulting milk that is not as fine or as creamy as the first press, but can be combined if a greater volume is desired. When all the nutty goodness has been wrung out, the almond meal can be dried, and the grounds used for cookies or pie crust.


(I haven’t yet been successful with my almond milk ice cream; don’t worry, though, I’ll be sure to let you know when I am. My attempts have so far been good, but what I’m looking for is sublime!)

Anyway, here’s how to make almond milk. Also, I have no idea what's up with the weird font sizes. Sorry about that. I can't change it for some reason.


Almond Milk


Notes: Internet research says that the almond skins make the milk bitter, and thus to blanch them, but I found (the second time) that soaking them overnight was just as effective at loosening the skins, and one less step to boot. The first time I made this, I added an additional half cup of cashews for more fat, hence more creaminess. It worked, and was delicious. The amount of water and nuts can be adjusted as you wish to make a thicker, or a more watery, milk. Make sure to get raw, unsalted nuts. I’ve also heard that the raw nuts available in stores are pasteurized, but that truly raw nuts can be purchased wholesale? I just used what I could buy in the store. Lazy me? Most recipes use a “sprouts bag” to squeeze the milk out of the puree; I ended up getting a “hops bag” (for some home-brewing step or another, I’m assuming ), which worked just fine. Any fine nylon mesh bag should work, and if you don’t have access to one and don’t want to wait for an Internet order to come in, a finely woven kitchen towel would probably work.


1 c Raw Almonds

(½ c Cashews, optional)

2 c Water


Let almonds soak overnight in the fridge. Drain. Slip skins off of the nuts. Rinse. Blend with water. Strain in bag, squeezing as much milk out as possible. Repeat if desired.


P.S. If you want to save the almond meal (and why not?), spread out on a baking sheet. If you live somewhere dry, you can probably just leave this out; since New York is so steamy right now, I put it in a gas oven (left off, it is still dry and warm in there). Crumble and store in the freezer.


Friday, February 12, 2010

The Momofuku Slow-Poached Egg with Miso Butter


Dear Michelle,

Jeff got me the Momofuku cookbook for Christmas. Or, rather, Jeff got us the Momofuku cookbook for Christmas; he knew what would happen if he got me that book. We've been to one of the three in the family of restaurants only once, and it was transcendent experience, made even better by the company of good friends and my first taste of nigori sake. It was enough to convince me that I wanted to own that cookbook when I heard it was coming out.

So far, we have made pork belly ssam twice, sour cream ice cream once, and the scallion ginger sauce several times; all very very good, and all things we will make again. And, of course, there is the slow-poached egg. As you read on, at some point you will wonder, "Is it really worth taking the time to do this?" Stay with me. It is.

For anyone who likes eggs, and by that I mean likes eggs enough that you like the white set just so and the yolk just runny enough, you know how difficult achieving this consistently can be. I've been making sunny-side up eggs for years, and I still mess them up sometimes, and EVERY time I do this I feel like my breakfast has been ruined. Almost worse than a set yolk is a not-quite-cooked-enough white. So, what if I told you that, for about an hour's worth of on-again off-again attention, you could have perfect eggs for a whole week?

These eggs are so perfect because they are cooked in what is essentially a sous-vide method. True, there is no vacuum packing, and no wondering if it is really ok to cook your food in plastic, but the principle is there; submerge something self-contained in hot, circulating water set to a particular temperature that perfectly cooks what is inside, and what you end up with will be neither over-, nor under-cooked. For a little color and flavor, you then sear quickly and serve.

The result is an egg that has a creamy yolk and a white that is just on the right side of done, gelled on the line between opaque and translucent. The mouth-feel of the egg is luscious, and is hands down the best prepared egg I have ever had.

Of course, it doesn't hurt to lightly fry the egg in pork fat, and slide it down onto a piece of good bread smeared with miso butter (miso is fermented soybean paste, available in asian markets, and probably most grocery stores). Miso butter, like this, seems to be an invention of Chang's, and a very good one. It's a salty-umami flavor sucker punch that hits right on the back of your tongue, like really good bacon does. And, like bacon, it is perfect with an egg.


I haven't even gotten to the best part about this egg ( I know, give it a rest, right?), which is that you can make a bunch, chill them, and put them in the fridge for later use. Breakfast? Easier and quicker than frying a raw egg! Lunch? Soba noodles with some sort of vegetable, mixed with miso butter and an egg on top! Variations? pile steamed greens on your toast, or, like I did this morning, wrap two of these little guys in some salami (yeah, that's right, salami. But not the kind you're thinking, unless you are lucky enough to get it from the same butcher I do. I could devote a whole post to this stuff. Or, if I was inclined to do such things, write a poem), and nestle the whole mess down onto miso-buttered toast. Heaven! (Mom, if you're reading this, I promise I had an orange afterwards)

Before I start the how-to, let me recommend again the Momofuku cookbook. If the above wasn't enough to convince you, please trust me that it's worth the $40. That's not even enough to pay for dinner at one of Chang's restaurants. The recipes are very accessible, and range from complicated to easy. I feel like I could someday make the pig's head torchons, but for now I'll stick with the pork buns. Plus the writing is good, and the photos well done. Jeff notes that this is not a cookbook for the beginning cook; I'm not sure I agree, but that's only conditional on the enthusiasm of said cook. I do know that you will be seeing a lot on here that is directly from/ inspired by this cookbook.


Slow-Poached Egg from Momofuku by David Chang and Peter Meehan, pg 52

Notes: I've used a smaller pot for these, but this last time used my Le Creuset dutch oven. Go bigger. The more water, the less volatile the temperature, the less you need to hover and can do more interesting things. Have cold water handy, and if you just have a smaller pot, ice cubes. Use a candy thermometer. They are more accurate than meat thermometers, not too expensive, and more useful than you'd think. Especially if you make these eggs as often as I do. Get REALLY good eggs; what you end up with will reflect what you start out with. The best eggs, by far, are home or small-farm raised eggs. If the yolk is yellow instead of orange, you need to find better eggs. You discard a part of the white that doesn't firm; this is about 1/4-1/3 of it. Therefore, you might want two eggs where before you'd eat one.


Fit 1 large pot with steamer basket or just something to keep the eggs suspended in water. Fill enough to cover eggs plus some (but not full; you want room to add cold water later for temp. control), and set on stove. Secure candy thermometer so that tip is suspended in water; you will leave it here. Heat over medium low to 140-145 degrees F. Add eggs. When temperature comes back to 140-145F, start timer for 40-45 minutes. I usually do 45, because I like them a little more done. Check water regularly; keeping it in this temperature range is key. If the temp is creeping up to 145, add a little cold water/ice to bring it back down. Keep the heat as low as possible, and add cold water in small increments. With the large pot, I checked about every 10 minutes, but start off with 5 till you can gauge how quickly the temperature changes. When timer goes off, chill in ice bath. Refrigerate or use.


While eggs are cooking, make miso butter. I like about half butter to half miso; Chang uses 1/2 c miso with 5T butter. I find that to be a little too salty for my taste, especially considering the amount that I use. However, in 1-1 quantity, the miso butter will become hard when refrigerated. Play around with it and see what suits you. Different brands will also taste different. This was my first foray into cooking with miso, so I regret that I cannot specify a preferred brand.


To make: mix softened butter with white miso until creamy. Make extra. Spread on toast, to be ready for the egg. (See 2nd photo in main body of writing for finished miso butter)

Heat a frying pan till hot, then add a small amount of fat of your choice. While pan heats, crack egg into a bowl, and discard thin white (I crack the eggs into my hand and the loose white falls away).


When fat shimmers, add egg(s). Fry till just colored on each side; you are adding flavor and just barely firming the egg, not trying to cook it through. Eat immediately. Do the same if egg comes out of the fridge; give it a touch longer to warm through. Chang uses the eggs, not fried, in soup as well, and recommends warming them under very hot tap water for a minute.


Thursday, January 21, 2010

Goat Cheese Souffles

Dear Michelle,

These are not to be lightly dismissed. Like most souffles, they are not without effort to produce, but believe me when I tell you that it is so worth it. They are light, rich, tangy with goat cheese, and crunchy with nuts; both indulgent in flavor and relatively healthy, they are perfect for when you want more than a salad but less than a gratin. Cooked in a water bath, unlike most souffles, they don't rise as high but are more stable, and so can be reheated for lunch or dinner the next day.

I first made these several years ago for a dinner party. I often willfully forget that you're never supposed to make something for the first time when people are coming over, but I've not had a serious mishap yet, and most of my friends are happy enough to have someone else cooking for them that I don't worry about it too much. Nor did I need to, when I made these the first time. Or the next, or the time after that. I wouldn't say they are foolproof, but if you closely follow the directions you will be rewarded. This recipe is out of the 1997 Joy of Cooking, a book which has rarely failed me (the exception that comes to mind is butter cream frosting; Julia Child's poached egg butter cream is the way to go).

My mother is usually happy to let me cook dinner when I offer; this way she doesn't have to worry about it, and usually my parents are pleased with the results. There was that time with the brussels sprouts, but overall they seem to like what I make for them. I knew they would love the goat's cheese souffles, and we've had them several times since the first. My father (a gastronomically indulged man) is always asking why we don't make souffles for him more often (telling him he could make souffles would inevitably lead to disaster), so the promise of these for dinner, and leftovers, will always make him happy.

Goat Cheese Souffles, pg 139 1997 edition Joy of Cooking

This is one of those recipes you'll want to read through more than once before starting, and assemble all ingredients and kitchen equipment you'll need. Trust me, you'll be happy you did. Meanwhile, preheat oven to 350F.

3/4 c walnuts or pecans
1/4-1/2 c softened unsalted butter
1/4 c cornmeal
3 T unsalted butter
1/4 c flour
2/3 c milk
10 oz fresh unripened goat's cheese
5 lg eggs
2 cloves garlic, very finely minced (or 2-3 T shallot)
1/4 t dried thyme (in the summer, I'd use fresh, finely chopped; here, I used herbes de Provence)
1/4 t salt
1/4 t white pepper (I used black, because that's what we had)
1/4 t cream of tartar

Toast nuts. While keeping an eye on these, generously butter 8 6-oz ramekins. I used a pastry brush with the softened butter. Finely chop nuts when cooled, then combine with cornmeal. Roll this mixture around the ramekins until thoroughly coated. Allow some extra to remain on the bottom. The JOC recommends dividing the remaining mixture among the ramekins, but I think that is too much. It is crucial to have the ramekins properly buttered and coated, as this will help the souffle slide up, so don't skimp. Start a kettle of water boiling for the water bath, and make sure you have a baking pan that fits all the ramekins.

If you haven't already chopped the garlic/ shallot, do this now. Divide the eggs; you'll want 5 whites and 4 yolks. Be very careful to avoid contaminating the whites with yolk or oil. I thoroughly clean two smallish bowls with soap and hot water, then wipe them with a paper towel and vinegar to degrease. Get another small bowl, for the yolks. Break and separate an egg (I use my hands to separate, I think it's easiest), putting the yolk into its bowl, then adding the white from the first to the second "whites bowl". This ensures that if the yolk does break, you only loose one white and not all of them. I know this sounds incredibly OCD, but if your whites are contaminated, they will not whip properly, and you'll have to start over again. It's worth washing and preparing the whisk/beaters and mixing bowl that you will be using at this time as well.

Warm milk. Melt 3T butter in a saucepan over medium heat. Stir in flour until smooth, continuing to cook, stirring, for 1 minute additionally. Remove from heat and stir in milk (slowly, or it will clump; I use a whisk, but if you do this, stir, do not aerate with it). Return to heat and bring to a boil, stirring briskly, until very thick (see below photo).

Scrape into bowl, then add goat cheese and mash till cheese is melted. Add in: 4 egg yolks, garlic or shallot, herbs, salt and pepper.

Beat whites until stiff but not dry, adding cream of tartar once they begin to foam.

Stir 1/4 of whites into souffle base to lighten it, then fold in the rest. It should not be combined all the way; there will be some small bits of just white visible.

Spoon into ramekins and place them into pan; add hot water till about 3/4 of the way up the sides. Bake until a skewer inserted into the middle comes out clean, about 30 minutes. The tops will be slightly golden. Do not open the oven door to look until at least half the cooking time has passed. Let stand in water bath for 15 minutes, then invert onto salad or plate. Can also be served flipped the other way around.

We ate them with pear and green salad, and slices of baguette brushed with the leftover ramekin butter and crisped in the oven.

Good eaten after reheating in the oven the next couple of days.