Wednesday, March 30, 2011

Clarified Butter and Ghee


Dear Michelle-


Those eggs sounded so good that I made soft-scrambled eggs and toast for breakfast today. I added a creamy blob of butter halfway through, and some rosemary salt from The Meadow in Portland on top. It was amazing. I love the table cloth you are using in the photos of the eggs!


I've been on a diet of sorts the past two weeks or so. It's not a losing weight diet, but the cleansing sort. It is designed to be easily digestible, to reduce the amount of energy the body puts into dealing with digestion and daily elimination of toxins, which leaves more energy for eliminating built-up toxins and inflammation. Exciting, huh? Just wait! Not allowed is any grain with gluten, refined sugar, alcohol, caffeine, soy, or any animal products besides chicken meat (apparently very easy to digest--who knew?) and Indian clarified butter, ghee.


As you can see, there's not much variety called for in the diet, but it's not supposed to be about gastronomy. This was perhaps the hardest thing for me to deal with. My daily diet consisted of oatmeal with applesauce (unsweetened, organic) in the morning, and lunch and dinner were servings of kichadi, a mixture of spices with mung beans, rice, and vegetables. It wasn't so bad, and I found a spice mixture that was to my liking, but there's no way to get around that kichadi=mush. The things that made it more exciting were an allowance of chutneys and ghee. I bought a couple of chutneys, whipped up an additional easy apple-apricot-ginger chutney, and have made two batches of ghee.


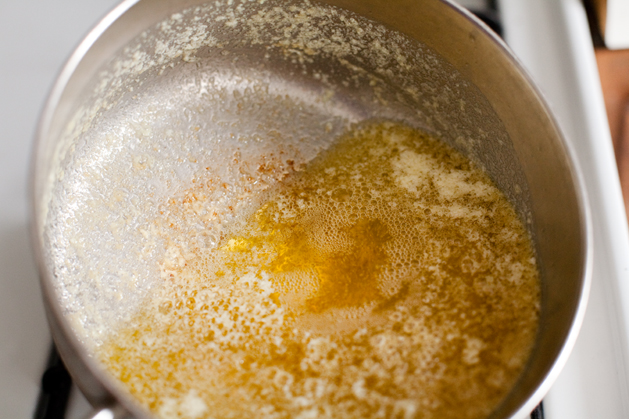
I thought until recently that ghee and clarified butter were one and the same, but that's not the case. Butter is made up of three things: fat, water, and milk solids. Clarified butter is just the fat; ghee is the fat after the milk solids have toasted a little, lending to it a delicious nutty flavor and a gorgeous golden color. The advantage to using this "purified" butterfat over regular butter is that it does not burn as easily, so it can be used to impart a buttery flavor to foods in which you'd otherwise have to use oil. I don't know if this technically means that ghee has a higher smoke point than butter does, but the milk solids present in butter do burn before the oil does.


Ghee is also okay to eat for those people who are sensitive to dairy, a big treat if you have otherwise been avoiding butter. I know that there are supposedly good butter replacements out there, but let's be honest here for a minute--all things being equal, would anyone choose margarine over good, old fashioned butter?


Because the milk solids and water have been taken out, all clarified butters have a longer shelf life than regular butter does. One can see why that would be so valuable in a hot country like India, so it is not surprising that ghee has a sacred role in some Hindu rituals, as well as a hymn dedicated to it. It is much used in Ayurveda, traditional Indian medicine. 


When making clarified butter or ghee, it is important to start with organic butter. I was told once that added hormones accumulate in the fat of animals, and that was enough to keep me buying organic butter. Though I do not buy organic across the board, I am careful to only buy organic dairy, eggs, and meat. 


Making ghee is pretty easy. So easy, in fact, that I don't even need to write out a real recipe. Put butter in a deep pot. I used a pound, and most sites say that you'll lose about a quarter of volume in the process of cooking. Heat the pot on very low. The butter will melt, then develop film. It will pop and sputter, and fill your kitchen with a heavenly scent. The film on top becomes harder (this can be skimmed, I don't bother), and some milk solids will fall to the bottom of the pot. Once the popping and sputtering stops, about a half hour in, you have clarified butter. If you want to make ghee, watch the pot closely at this point; you want the milk solids on the bottom to brown lightly, BUT NOT TO BURN. Once browned and toasty-smelling, pull from the heat. The easiest way to decant this is to line a strainer with cheesecloth and poor through to a medium sized mason jar. This should hold indefinitely in the fridge. Below are photos of the various stages that butter goes through to clarify. I'd recommend cooking it in a large enough pot that the uncooked butter covers most of the bottom of the pot; I made some ghee recently that burned before it had stopped popping, I think because the melted butter was too shallow.


Friday, March 18, 2011

Softly Scrambled Eggs with Fava Beans

Dear Devon,

Thoughts of your celery kimchi have my mouth watering. I’m imagining a spicy, crunchy and refreshing bite soaked in a salty and tangy brine. Homemade kimchi is probably the easiest bit of “cooking” out there. I have made several batches since moving to Barcelona, calling upon local ingredients and rather inventive brining methods (fridge is small). But my next batch, will definitely involve celery.

Something else I’ve been drooling over is Anne Willan’s The Country Cooking of France. This book has become the standard by which I judge all other cookbooks. It has absolutely gorgeous photographs for almost every recipe in the book, and includes detailed instructions. Never underestimate the importance of detail when explaining how to prepare pig’s feet or soufflĂ© techniques.
And while I consider myself fairly handy in the kitchen, her text does leave me a bit intimidated. She seduces me with recipes that seem easy to execute but conjure battle scenes with an unwieldy giant in my imagination. Am I exaggerating? You’ve known me for years and you must know that I tend to embellish.

It is time to stop reading and move towards the stove. I’m living next to some of the greatest markets and pork products in the world. I should embrace some of Willan’s more adventurous recipes. When else will I have this chance? Plus, I am lucky, my dinner guests these days are forgiving, adventurous types.

For a warm up exercise, I chose Willan’s recipe for softly scrambled eggs with wild mushrooms. If you haven’t tried softly scrambled eggs, I suggest you to crack some eggs and try it tonight. The texture is buttery and light. The trick is to scramble the eggs over low heat. It takes an extra 10 minutes or so, but is definitely worth the wait. Overflowing from every market stand when I first arrived in Barcelona, wild mushrooms have disappeared into their damp retreats until the fall. Undeterred, I substituted fresh fava beans.


Softly Scrambled Eggs with Fava Beans
Adapted from Anne Willan’s The Country Cooking of France

1 pound fava beans in the pod
1 slice of unsmoked bacon, cut into chunks
4 eggs
¼ cup milk
1 pinch salt
toasted bread

Bring a large pot of water to boil. Drop in the fava beans (in their pods). Boil roughly 5 minutes before removing from the stovetop. Drain and soak in cold water. When the beans are cool enough to handle, break open the pods and remove the beans.

In a sauté pan, slowly fry bacon. When the bacon is nice and crisp, remove from the pan and reserve in a small mixing bowl. Add the shelled fava beans to the bacon fat. Cook over medium heat until nicely browned. Remove from the pan, adding favas to the bowl with the bacon.


In a separate bowl, whisk together eggs and milk with a pinch of salt. Wait for the pan to cool down, before cooking the eggs. Turn the flame to medium-low. Add egg mixture. Using a wooden spatula, stir the eggs, scraping the sides and bottom of the pan. The goal is to prevent the eggs from setting too quickly or clumping. Vigilant stirring is the key. Cook for about 10 minutes. The eggs should be loose but not runny, without any traces of raw egg. At the last moment, stir in the favas and bacon. Freshly chopped herbs would be a nice addition. I recommend: chive, chervil, dill or parsley.

Serve over toast and with freshly grated black pepper.

Tuesday, March 15, 2011

Kimchi Party!


Dear Michelle-


Oh man that pizza looks good! I had been hoping you were going to follow up "how to make pizza dough" with some actual pizza. I'll have to try that recipe sometime, but I have to admit that it's hard to give up our shortcut--pizza dough bought from Carmines, the pizza place on our block. In the pros and cons of New York City list that I'm sure every non-native New Yorker has, general proximity to pizza joints is definitely a pro. 


Another wonderful thing about New York is the constant movement of the city--people connect, create, build, and come up with things like the Brooklyn Brainery, a space dedicated to hosting cheap classes ($5-$25) in which you can learn about a variety of subjects. It's pretty awesome. Jeff had seen something online about a kimchi party they were having on a Sunday in January and thought I might be interested, which, duh, of course I was. 


Here's the gist of kimchi: in its purest form, it is a fermented cabbage, much like sauerkraut. However, it can be made with other vegetables, turnips being commonly used, and is generally quite spicy. The kimchi we made used cabbage, shredded carrot and daikon radish, a sweet rice porridge, garlic, ginger, scallion, fish sauce, flaked pepper, sugar and salt. The second kimchi that I made had celery instead of cabbage, but everything else was the same. In case you think I'm greedy for making two, I'll add that I did share my celery (and was pleased to see that it was almost gone by the time I left!). Once you're done mixing your kimchi, you can eat it immediately or let it sit out at room temperature for a few days to ferment. This makes it bubbly and pungent. I never took a photo of my finished product, sorry. It was good, though. I'll certainly make it again! We love Kimchi, and it will be nice to experiment with different vegetables.


Amy and Mary and I met at the G-train, and somehow managed to turn a two-minute walk from the subway into fifteen. I figured, no problem, as we'd planned to arrive at the beginning of the five-hour window of the come-when-you-will workshop. It was packed. I wish I'd taken a photo of the space, and of the crowd, but it was all I could do to follow my friends around taking photos and then dart in line to make my own kimchi.


Jeff and I had tried a kimchi plate at Mrs. Kim's in Greenpoint a while ago, on which the celery kimchi was both unexpected and unexpectedly good. I brought a bunch of celery with me to the party, hoping to make a jar with that and one with cabbage. The people running everything were really nice about it, pointing me to a sink and a knife and cutting board to prep, along with exclaiming what a good idea the celery was. 


I chopped while the short presentation went on, and then watched the free-for-all begin. I  exaggerate a bit--there was a line--but it was difficult to squeeze in to take photos. The best part was at the end of the ingredients line, where people were mixing and packing their creations everywhere. They were taking turns holding the bowls for each other, mixing on the floor, really anywhere they could. There was kimchi everywhere! I headed over to a table that most people had overlooked somehow. 


Despite how hectic everything was, everyone was good-humored. I guess a $5 make-your-own kimchi (ingredients-included) party makes people happy. It certainly was a good deal, especially for the people who brought GIANT containers and filled them up with the spicy fragrant cabbage mixture. 


The recipe below is only a guideline, as the amounts of various ingredients differs greatly from recipe to recipe. I let my kimchi sit out for three days before moving it to the fridge, though next time I might only do two, as it got a little soft for my taste. I also might go heavier on the ginger, and add more scallions. If you use celery, don't forget to de-string the stalks! 


There are a variety of things you can do with Kimchi: I like it tossed with with miso butter and soba noodles, in stir-fry or fried rice, or blended into a sauce for vegetables or tofu. It is commonly eaten as one of several small side dishes that are served with Korean meals, or made into kimchi pancakes or kimchi stew. I love that something that seems so specific--spicy fermented cabbage--can be used in so many dishes. 


This workshop happened just a couple of days before the snowstorm here in January, so here is a link to some photos of that. 


 Kimchi, Brooklyn Brainery style

This recipe is what the Brooklyn Brainery had up on the wall during the party, and also what they sent out via email afterwards. It is verbatim. 

Use a little more garlic or a little less ginger, do whatever you think you’ll like! 

• 1 tsp garlic 
• 1 tsp ginger 
• ¼ cup shredded radish 
• 2 tbl shredded carrot 
• pinch of green onions (3 tbl, but it’s tough to measure) 
• 1 tsp sugar (or ¼ c rice porridge) 
• 1 tbl onion paste 
• 1 tbl fish sauce 
• 1-3 tbl red pepper flakes 
• 1 ½ cups cabbage 

If you’d prefer to make cucumber kimchi, follow the exact same instructions, just stuff the ingredients into a cucumber at the end! 
And radish kimchi? Just mix in the cubed radishes! 


Kimchi Technique 
With any kimchi recipe, there are three steps. 


1: Brining 
After you cut up your cabbage, you need to salt it to draw out the water and do some magic on the texture and flavor. 
Method 1: Mix 1 cup of salt into the cut-up cabbage for every 10 pounds of cabbage. Let sit for 1 ½ hours, mixing every half hour. 
Method 2: Mix 2 cups water with ½ cup salt for every pound of cabbage. Cut the cabbages into quarters, sprinkle salt on the stems, and submerge them in the salty water for 4-5 hours. 


2: Mixing 
Mix together everything except your cabbage. 
Tip: The more finely you mince your garlic and ginger, the better the end product will be. If you can get it paste-like with the held of a food processor you’re in good shape! 
Now mix it up with your cabbage. 


3: Fermenting 
While you can eat your kimchi right away, it doesn’t get awesome until it’s started to ferment. Fermentation happens when little friendly bacteria work their way through the sugars, turning them into acids and CO2.. This is what makes kimchi taste sour. 
How do you ferment? Just leave your kimchi alone and they’ll get started without you. It happens a lot more quickly on the countertop than in the fridge – I like to set my kimchi on a table in the kitchen for a couple days before I move it into the fridge. Don’t worry about it spoiling – the good bacteria have all sorts of methods they use to keep everything clean. If you notice a little white scum on top, scoop it off before you put it in the fridge. 
Once it’s been around for 3-4 weeks, it’s probably gotten to the point where it’s pretty sour and a good candidate for kimchi stew! 

Friday, March 4, 2011

Pizza Dough Part II: Mushroom and Garlic

Dear Devon,

Ever since I discovered how easy it is to make fresh pizza dough, I have made pizza for lunch and dinner several times. I am surprised that I never thought to try it before. How foolish of me, to have avoided yeast-based recipes simply for fear of pulling dense, unleavened bricks from the oven!

While the process of making dough is a constant, toppings offer a freedom of imagination almost unparalleled since the “recipe” for fried rice. Of course, there is the standard use of tomato sauce and cheese, but beyond that… the possibilities are endless. Rummaging through the fridge has produced a lengthy list of unusual, but delicious combinations. In a pinch, I have used smashed garlic and onions. It was all I had in the house. It was delicious, though gum was helpful after lunch. The roasted garlic gave the pizza a surprisingly strong smell and a hint of burnt sweetness. Why isn’t this a standard topping?


Picking my own toppings is definitely the best part of making pizza at home. I don’t limit myself to the ones that you can find in pizzeria display cases. I’ve found success with a variety of toppings both in combination and by themselves. Thinly sliced eggplant rounds, goat cheese, mushrooms, spring onions, rosemary, fresh tomato, and of course, garlic, just to name a few. But don’t let me inhibit your imagination!

P.S. You’ll notice that I’m using a paella pan as a pizza board. I like to think that living in Spain is taking my resourcefulness to new heights.


Mushroom and Garlic Pizza

Prepared pizza dough, enough for a 12 inch pizza
3 to 4 white button mushrooms, sliced paper thin
3 cloves of garlic, smashed
1 round of fresh mozzarella cheese, thinly sliced
¼ cup tomato puree
cornmeal for dusting
salt

Preheat oven to 450 degrees F. To get that crisp texture, make sure the oven is at temperature before putting the pizza in. Lightly sprinkle the pizza board or pan with a bit of cornmeal.

Lightly flour a work surface. Roll the dough roughly circular, adding additional flour as necessary. Carefully lift dough and place onto baking pan. Spread tomato sauce leaving a ½ inch crust. Top with cheese, mushrooms, and garlic.

Bake in hot oven for 15 minutes, until the cheese is melted and the crust is nicely browned. I like to turn on the broiler for about 2 minutes at the very end. I prefer my pizza slightly burned.

Thursday, March 3, 2011

Double Celery Soup


Dear Michelle-

I am so ready for Spring. We just got back from a trip to Oregon to visit my in-laws and meet our new niece, and though it was rainy, even a little snowy, Winter is on its way out there. Crocuses and periwinkle were blooming, and the daffodils were on the cusp. Portland was green and mossy, beautiful when the sun made a brief appearance.


 We had a great time. We played with the baby, watched cable on the huge TV, and took advantage of much lower food and movie costs. There's a great lunch spot in Salem, OR, that deserves a mention here called the Wild Pear; I've been there several times over the years and it never fails to please. My sister in law and I had a terrific lunch there followed by gelato (also very good), and then I went back for both with Jeff and his mother the next day! We also went to see both Somewhere and Black Swan. Somwhere was very much what you'd expect of a Sophia Coppola movie, but in a good way (with the exception of the ending- what? really?). It was beautiful, and more about mood than it was plot. Black Swan was fantastic. I've heard it called melodramatic, by more than one person, but it is after all a psychological thriller, and very, very intense. Go see it if you can!


When in Portland, we went out to karaoke with some friends, which was great fun. You know I rarely drink, but karaoke is not something best done sober, at least not for me. I tried it once, but I never will again! We went to Voicebox, and I tried several of the sakes there, but I was blown away by one of them, Hou Hou Shu Sparkling Sake, described as, "Heaven in a bottle." Damned right. That stuff was amazing- light, floral but not too sweet, with a hint of coconut. Unfortunately it was also not so cheap, but I split one with someone and made do with the Sake2me sparkling sake after that, which was perfectly good. Unfortunately, I can't say the same for my karaoke skills, but I do have a lot of enthusiasm.


So now we are back in Brooklyn, wishing for Spring, and having seriously overindulged while away. It was the perfect time to make a Patricia Wells recipe I had fond memories of, double celery soup. This is a very simple, restorative soup with few ingredients: celery root, celery stalks, leeks, stock, and salt. She suggests adding a bouquet garni, but I didn't want to spend money on fresh herbs and added some herbes de Provence instead.


The soup is intended to be served as diced vegetables in broth, but I've found I like it as well, if not better, pureed with a little butter added. I served it with buttered bread, and crutons would be good too. Added is a photo of Jeff post-dinner that fit the color scheme. Also, here are some photos of Portland.


 Double Celery Soup from Bistro Cooking by Patricia Wells pg 31, recipe is verbatim

1 medium celery root, (about 1 lb; 500 g), peeled and diced
10 celery ribs, cubed
3 leeks (about 9 ounces; 270 g), trimmed, well rinsed and cut into thin rounds
Bouquet garni: 1 large sprig of thyme, 3 imported bay leaves, several sprigs of parsley, tied with string
2 quarts (2 l) chicken stock, preferably homemade
Salt and freshly ground pepper
A handful of chopped fresh herbs for garnish: including chervil, chives, flat-leaf parsley

In  large saucepan, combine the celery root, celery, leeks, and bouquet garni. Add the stock, and season gently with salt and pepper. Bring to a simmer over medium-high heat. Simmer until the vegetables are soft, about 25 minutes. Adjust the seasonings. Pour into warmed shallow soup bowls. Sprinkle with the chopped herbs and serve immediately. Yield is 6 to 8 servings