Saturday, October 31, 2009

Arugula and Cantaloupe Salad


Dear Devon,

Thanks for having us over the other night. Dinner was amazing! I must confess, I am a bit nervous about cooking with bacon fat. Perhaps I will have a change of heart, but until then, I'm passing along this easy recipe for a delicious arugula salad. It's always good to balance your diet. And as my petite frame can't bear an extra ten pounds, I've decided to skip the train transfer at Times Square and instead walk the seven avenue blocks to and from the train daily rather than skip out on all the great food. True, walking two miles a day is not a substitute for real aerobic exercise, but I figure it won't hurt. Now, the only real issue is the impending cold weather.

Arugula salad is one of my favorites. But, strangely, I don't like the taste of arugula. By itself, I find it overwhelming- too peppery and acidic. How then, you ask, can I say that arugula salad is one of my favorites? Somehow, combined with any number of ingredients, both mundane and exotic, the aggressive flavor of arugula is tamed. The possibilities are endless. Some of my favorite salads with arugula include:

a) tomato, egg, and dried cranberry
b) bacon, hazelnuts, steamed asparagus
c) roasted chicken, figs, and goat cheese.

Lightly dressed with a sprinkling of lemon juice and good drizzle of olive oil, a pinch of salt and optional pepper, arugula salad makes a great first course or a healthy lunch.


In this easy and elegant salad, I include conventional salad ingredients like toasted walnuts and goat cheese, and use diced cantaloupe to liven up the salad. Papaya is also a nice substitute and is actually my first choice. In the throws of fall, this delectable summer fruit is no longer available, or at least not to the budget-minded. Both fruits bring an unusual freshness and lightness to the spicy arugula, buttery walnuts, and tangy cheese. Serving salads mixed with fruit is one of my recent happy discoveries. In fact, I'm surprised it isn't more common, given how tasty it can be.

Picking a melon can be difficult, but I have a few tricks. I look at the veining on the skin: veins should be of an even thickness throughout the melon; the color should be light tan throughout. Check the stem: most melons arrive at supermarkets with their stems removed. Gently press the indentation where the stem used to be. It should be firm but have a bit of give. Finally, the fruit should feel heavy for its size. That's how I choose a sweet and ripe melon.


My dressing of choice is usually a simple lemon juice and olive oil dressing. But for this salad, I decided something a bit more complex would be nice. I chose a balsamic vinegar, whisking in a touch of honey to smooth out the rough edge of vinegar. In general, I don't believe in buying salad dressings- you only need a few ingredients on hand to make a great dressing. It doesn't make sense to use the store-bought stuff.


Arugula and Cantaloupe Salad

2 generous handfuls of arugula, washed and dried
1/3 cup diced cantaloupe
1/4 cup walnuts, chopped and toasted
2 tbsp goat cheese
2 tsp balsamic vinegar
1 1/2 tsp honey
3 tsp olive oil
salt and pepper

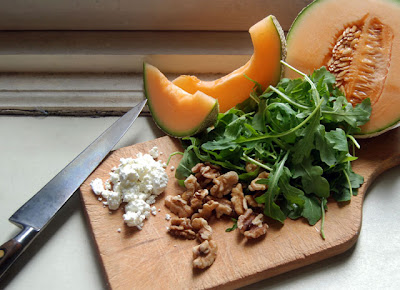
Wash your arugula, blotting dry in between layers of paper towels. Use a salad spinner for quicker results. Wash the outside of the melon and slice in half. Remove the seeds and slice into what my sister calls "smiles." Remove the orange flesh, cutting away just where the flesh turns green. Dice the cleaned melon into one inch chunks. Place the walnuts onto a sheet pan and toast in the oven at 350 degrees until fragrant and light golden brown, about 7 minutes. Allow the toasted walnuts to cool before roughly chopping.

In a large bowl, toss together cleaned arugula, chopped cantaloupe, and toasted walnuts. Crumble in goat cheese. Whisk together balsamic vinegar, olive oil and honey. Drizzle over salad and toss. Liberally salt and pepper.

The proportions are general suggestions. Build the salad according to your personal taste. If you like a lot of cheese, add more. Don't like walnuts? Use pecans or pumpkin seeds.

Soon,
Michelle

Thursday, October 29, 2009

Chorizo 2: the Other Half of the Link

Dear Michelle,

It was so nice to see you guys last night! There's nothing quite like an impromptu weeknight dinner party, huh? It's such a guilty pleasure, especially when you eat like we did. Of course, I can't forget the cava. It went perfectly with our dinner.


At least what we ate last night was somewhat healthy, with the pan-fried potatoes and chorizo balanced by silky sauteed chard and crisp green beans flavored with garlic, chili, and lime. It's too bad that we got impatient after the first couple of smashed fried potatoes didn't work out; although they were also good fried in slices, the smashed potatoes were so pretty, and the texture was superior.


Just like before, the brilliant orange fat colored the potatoes, and the chorizo cubes were crispy, flavorful, and succulent. There are so many ways a potato can be fried, and all of them are good, but I'm glad you suggested trying to fry them smashed. I liked how the interior stays fluffy and moist, while the outside crisps up golden brown and delicious. Of course, frying them in pork fat doesn't hurt the flavor. After I used the first half of the chorizo, I knew I had to wait till you came over before I used the second half.


The big surprise of the night was the kale and green beans. I had wanted to try out a recipe for brussels sprouts and green beans sauteed in garlic, chili and mint that was in the last Gourmet (sob, such a good last issue), but at the vegetable store, the kale looked amazing and the brussels sprouts didn't. Now, I love kale, but I'm aware that the majority of the population does not. Jeff falls somewhere in the middle; he'll usually eat it if I put it in front of him, but he'd never ask for it. However, last night, I believe both of the boys went in for seconds, and Jeff remarked that it would have been just fine without the green beans! I have to say, it was even better than kale usually is. Steaming it first really makes a big difference, and then when it is sauteed with garlicy olive oil and a touch of chili oil and lime to brighten it up, it becomes truly delicious. I think we're having the rest tonight with some tamales I have in the freezer.

As requested, recipes follow. That is, except for the mayonnaise sauce I made. I was not satisfied with it.

Can't wait to see you again soon! Until then,

D


Smashed Fried Potatoes with Chorizo, and Chili-Lime Kale and Green Beans

For the potatoes and chorizo:

small round potatoes
herbs de provence
pork fat or olive oil
1/2 a link of cured chorizo, casing peeled and chopped into 1/4 inch cubes (about a half cup)
salt

Steam potatoes till tender when pierced with a knife, about 10-15 minutes or more depending on size (while they steam, start kale and green beans, below). Let cool slightly. Heat a pan till fairly hot, then add 2 T fat, and chorizo. Fry till crispy, then remove, leaving fat in pan. Smash a potato till about 1/4-1/3 inch thick (you do not want it to fall apart, just flatten). I took a piece of tinfoil , folded it with the potato inside, and smashed it with my hand. It's fun. Fry potatoes in pan, adding fat as needed, just enough so the pan does not become dry. Sprinkle a pinch of herbs de provence on top. Press with spatula and do not flip until very brown underneath (or they will fall apart!), then repeat with other side. Salt. Alternately, you can slice and fry. Wimp.

For the kale and green beans:

1 large bunch of kale
several handfuls of green beans (sorry, I forgot to measure, I'd guess about 1lb), ends removed
olive oil
clove garlic, inner stem removed, chopped
pepper flakes ( I used allepo pepper, which has more flavor than heat)
lime
chili oil
salt


Rinse, then steam kale whole in a large pot until tender, 5-10 minutes (now is a good time to start frying the potatoes). Remove, squeezing lightly to release excess water, and roll up and cut into ribbons about 1 inch thick. Heat oil in saute pan over medium heat, then add garlic and about 1/4 tablespoon of pepper. When garlic has softened, add kale and stir occasionally. Steam green beans 3-5 minutes or until crisp-tender, then add to kale. Let sit over low heat, stirring occasionally, till potatoes are done. Squeeze half the lime in, add 1-2 teaspoons of chili oil (to taste- that stuff is hot), and salt to taste.

Make up a mayonnaise sauce. If it's good, send me the recipe.

Wednesday, October 28, 2009

Fall Gnocchi with Cabbage, Apples, and Chorizo


Dear Michelle,

You know, the first time I remember having madeleines was when you sent them to me my first year in college. I was so impressed! Can't wait to try this recipe.

I have been on a bit of a gnocchi craze lately. Ever since I lived in Florence, packaged gnocchi have never been the same for me. Compared to the puffy little potato pillows they have there (which are not really that hard to make from scratch, but time-consuming), store-bought gnocchi seemed so dry and heavy. That is, until I recently saw Jacques Pepin's technique, on a public television rerun of one of More Fast Food My Way. It seemed so obvious; instead of boiling them, you saute them in fat, then cover almost all the way with water and let simmer till they are almost dry. They are still a whole different thing than Florentine gnocchi, but they deserve a respect all their own. They get a little crispy and golden on the outside, and soft and tender on the inside, and they are perfect for this cold weather when you want something substantial.


Jeff and I tried a chorizo taco at our favorite Mexican restaurant (this place is seriously good, and easy on the wallet. Try the tongue taco. For the squeamish, there are lots of terrific normal tacos, and all sorts of other delightful things), and loved it. When we saw some chorizo at a local bodega, he wanted me to try cooking something with it. I think that the fresh version might be better in this dish; I imagine it would fall apart instead of staying in chunks, but those were perfectly fine. Like usual, it was a winning suggestion on his part. Not only does the sausage ooze a bright orange fat when it is cooked, and I do love anything that intensely colorful, but the flavor is amazing. It is smoky and peppery from the paprika, and crunchy and delicious like anything made from the fatty parts of a pig tends to be. Add in soft gnocchi, silky sauteed cabbage, and just-cooked apples, and you've got a winner of a cool-weather meal.


Fall Gnocchi with Cabbage, Apple, and Chorizo

1/2 link chorizo, casing removed, diced (about a 1/2 cup)
1/2 package pre-made gnocchi
1/4-1/2 small green cabbage, core removed, cut in thin ribbons
1 apple
bacon fat and/or olive oil
butter
1/4 cup chicken stock (optional)
splash beer (optional)
water
splash apple cider vinegar
salt and pepper
some sort of cheese to grate on top (optional, and we used aged Gouda)


Add 1T fat and/or oil to large, heated frying pan. Add chorizo and cook, stirring, till crispy and just browned. Remove, leaving fat in pan. Add gnocchi, and cook, stirring occasionally, till crispy and lightly browned (they will turn orange from chorizo fat, or I'd say till golden). Add cabbage and saute till mostly wilted. Add stock, beer, and water, or just water, till gnocchi and cabbage is 3/4 covered. Turn down to slow simmer, cover, and let soak up water for about 10 minutes, or until almost dry. Add apples. Add a splash of vinegar and pepper to taste. Stir in chorizo. Add salt to taste, and stir in 1T of butter. Plate and grate cheese on top if using.

Tuesday, October 27, 2009

Chocolate Chip Madeleines


Dear Devon,

I have recently developed a taste for coffee. In the past, I only appreciated its smell, and the ritual of brewing. Rarely, did I drink it. The best part had always been grinding the beans and pushing down the plunger on the French press. But gradually, I grew to appreciate its flavor. Sweetened with a bit of sugar and diluted with warm milk, coffee is tasty. Now, my biggest fear is becoming a coffee-dependent zombie. Don't worry, it won't happen. I've managed to avoid being zombified by restraining myself to a few indulgent sips in the morning.


Why is it that in my late twenties, I have finally come to enjoy coffee? I blame the accessories. What shoes or handbags, earrings and scarves are to a fashion statement, biscotti and madeleines, croissants or donuts are to a great cup of coffee. A buttery madeleine or a crisp biscotti lightly moistened with coffee soothes the nerves after the merciless call of the alarm and chases away the lingering grogginess of sleep. Dressed in a simple flannel bathrobe, I feel decadent and I confess a bit cavalier with my tight morning schedule. (If I'm late, I promise, there were delays on the train.)


Lately, madeleines occupy my mind. I love their elegant shape and subtle flavor. A recent trip to the Silver Moon Bakery inspired me to butter and flour my madeleine pan. Silver Moon on the Upper West Side makes the most delicious cakes, pastries, and breads. They flavor their madeleines with a light sprinkling of slivered almonds or chocolate. Inspired by this idea, I baked a dozen madeleines dusted with chopped bittersweet chocolate. Thinking about more madeleines for tomorrow, numerous flavors come to mind including coconut, pistachio, lemon verbena, jasmine, and dried cherries.


Forget the coffee, these are addictive!!


Chocolate Chip Madeleine
Makes 12 madeleines (adapted from Dorie Greenspan)

4 oz melted butter
2 eggs
2/3 cup flour
½ cup sugar
1/8 tsp salt
½ tsp vanilla extract
chocolate chips coarsely chopped

Preheat oven to 350 degrees. Prepare madeleine pan: butter molds and lightly flour. Set aside.

Gently melt butter over a pot of simmering water.

In a large mixing bowl, beat eggs with sugar until the ribbon stage. The mixture should be pale yellow and doubled in volume. Alternately mix in flour and melted butter in several stages, energetically whisking in between additions. The batter should be thick and dense. Flavor the batter with vanilla and salt, whisk until combined. Set aside for 10 minutes.

With a large spoon, generously fill each mold. Sprinkle the tops with coarsely cut bittersweet chocolate.

Bake for 16-18 minutes or until the tops spring back when gently touched. The edges should be golden brown. The madeleines should release from their molds fairly easily. Let rest on a cooling rack. Serve at room temperature or slightly warm.

P.S. I love your suggestion for everyday fruit tart. I am going to try it out. I just bought some beautiful tiny pears which will be perfect in your recipe. Will keep you posted!!

Wednesday, October 21, 2009

Everyday Fruit Tart


Dear Michelle,

That granola looks great! I went through a granola making craze last winter- my favorite was this, but with chocolate chips mixed in at the end. I can never resist the temptation to add chocolate. I saw another recipe recently that added pumpkin seeds, which also sounds really good to me. I bet crisped rice would be good too. Mmm, now I want to make some granola.

A couple of nights ago, for no reason in particular, I decided to make a tart for dessert. We didn't get to eat it after dinner, as I'd started it too late (oops), but I had a weekend-worthy breakfast the next morning; if anything can make waking up bearable, it's plum tart with a cup of steaming tea. The plums melted down to a jam-like consistency and the juices mixed with the sugar to create a red glaze that filled in all the gaps, but the crust stole the show. This was the most tender, flaky, and buttery crust I have ever had.


You know I use Julia Child's sweet short paste recipe (Mastering the Art of French Cooking I, pg 633) almost exclusively for tart and pie crusts, and I did this time as well, but with a slight change--I used cake flour instead of the standard all-purpose. I don't know why I never thought of it before. That soft wheat really makes a difference! There was not even the slightest hint of toughness. This crust is strong enough to hold a filling, but shatters to buttery deliciousness when bitten. I used the same weight of cake flour as was listed for the all-purpose, but if you must measure with volume, 1 cup all purpose = 1 cup 2T cake flour.

Julia's Sweet Short Paste, slightly altered, for one 10-11 inch crust.

7 oz or 2 cups, 4T cake flour (2 cups all-purpose)
2 T granulated sugar
1/4 t salt
11 T COLD butter (Julia calls for 8T butter and 3T shortening, but I always used all butter, due to lack of shortening in my fridge. Also, I think it's gross)
5-6 T cold water

Place flour, sugar and salt in a bowl and mix. Add butter, cut into 1T pieces. I find it easiest to start off with a pastry cutter, just to break the pieces up a little, then start cutting the butter into the flour with your fingers until it is in small flakes, about the size of oatmeal flakes. Work quickly so the butter does not become too soft or create a paste with the flour. Add water and mix just till a dough forms. Julia calls for a smear with the heel of the hand to further blend the butter and flour, but I omitted (forgot) and it turned out fine. Let rest in fridge for at least a half hour.

For major parental brownie points, make double recipes and leave individually wrapped in the freezer. My mother loves it when I do that.

Preheat oven to 375 degrees. Let dough warm a few minutes until pliant, and roll out to fit tart shell. I rolled this dough very thin, a little less than 1/8 inch. Prick all over with a fork, line with foil and fill with weights. Put in the oven for 5-6 minutes till dough is set, then remove foil and weights and return to oven till slightly golden, about 10 minutes more.

For the tart:

9-10 inch tart pan
4-5 empress or prune plums (substitute almost any fruit here; apricots, peaches, apple, etc.)
4-5T granulated sugar
2T butter, cut into about 8 pieces

Turn oven to 350 degrees. Sprinkle 1-2T sugar on crust. Slice plums into eighths, and arrange radiating from middle to the outside in circles. It is ok if there are a few gaps; with such a thin crust it is nice not to have too much fruit, and the sugar and the plum juice fills them with a pretty red syrup. Sprinkle with an additional 2T sugar, more if you like desserts sweeter or the fruit is very tart. Dot with butter, and set in oven. Cook 30-45 minutes until crust is deep golden and fruit is very soft. May be eaten warm or cold. Jeff ate his with whipped cream, or it would certainly also be good with vanilla ice cream, or creme fraiche.

For leftover dough: either freeze, if you have enough, or try wrapping around peeled, cored apple slices (1/8 apple) that have been tossed in cinnamon, sugar, and vanilla; the apples shrink a little, leaving you with a shattering cage of pastry, filled with soft apple. Delicious! These would be perfect deserts for a cocktail party.

Tuesday, October 20, 2009

Cinnamon Rasin Granola


Hi Devon,

Homemade granola, easy to make and tastier than store bought: why waste money on pre-packaged? Nothing jumpstarts your morning better than a big scoop of yogurt mixed with fruit and granola. I love granola but don't like many calorie-packed commercially boxed granolas. Unnecessary sugars and additives make eating a healthy alternative like granola more like eating a sausage and egg sandwich from the corner deli.

Making my own proved a much healthier and tastier solution. Controlling the ingredients is key to any recipe. Luckily, granola is flexible by definition, allowing for many substitutions and improvisations. I read through three recipes (the Joy of Cooking, Mark Bittman's How to Cook Everything, and Ina Garten of Barefoot Contessa fame) before finalizing my own formula. A comparison of the three proved that a recipe for granola is always a suggestion, rather than a specific technique. Add anything you like, toss with an oil / sugar-based mix, and toast in the oven until golden brown and fragrant.

Each of the three recipes varied slightly in their choice of ingredients and cooking instructions. Both the Joy of Cooking and Ina Garten called for the oats to be tossed in an oil and sugar-based mixture, while Bittman suggested cooking the granola on a baking sheet positioned over two burners of the stove. Proportions varied wildly from Bittman's 4 cups of oats to Garten's 6 cups. Each suggested an assortment of dried fruits, nuts, and spices, including: wheatberry, pecans, raisins, poppy seeds, and nutmeg. All three consider shredded coconut an essential component. I didn't use it- it's not in my pantry, so it's not in my granola.

I devised my own recipe / suggestion for granola. I opted for a simple base of old-fashioned rolled oats. I picked up some plump golden raisins and walnuts, not my first choice, but still adequate, at my local grocery store. The pantry was stocked with a thousand sunflower seeds, a remnant from a project a few months ago, and a box of raisins. At first, I was hesitant to use sunflower seeds, but upon tasting the final product, I loved it. They gave the granola a nutty and almost buttery flavor, something that was needed to balance the sweetness of the raisins.

For my first attempt, I did not want to be too crazy with my flavors. Bittman suggested adding nutmeg or cinnamon, to infuse the granola with warm and spicy notes. I used both spices and enhanced the flavor with maple syrup, omitting the recommended honey. I love honey, but this time, I wanted something that would tie into the dark tones of the cinnamon and nutmeg. Substitutions are fine. You don't have to run out to the store before making this. Use what you have and make thoughtful choices.

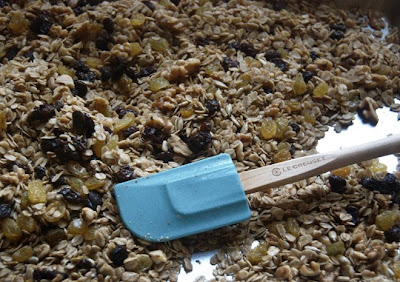
Since each author recommended a different baking time and temperature, I chose a moderate temperature of 300 degrees F and opted to check my granola every 10 minutes, giving it the requisite stir. Spread the mixture out evenly over the large pan to encourage even cooking. The wonderful perfume of roasting nuts and spices filled the kitchen. The texture and crunchiness determined when to remove the pan. Be careful when tasting, the granola is burning hot. Allow the granola to come to room temperature before mixing in an assortment of dried fruit. If you add the dried fruit too soon, it will get sticky and adhere to the hot pan and lose its shape.

The recipe makes an insane amount, roughly 8 cups. Store in a plastic container and it will keep indefinitely.


Cinnamon Raisin Granola

4 cups rolled old-fashioned oats
1 cup chopped walnuts
1 cup sunflower seeds
1 pinch salt
1/4 tsp nutmeg
1/2 tsp cinnamon
1/2 cup vegetable oil
1/4 cup maple syrup
1 cup golden raisins
1 cup black raisins

Preheat the oven to 300 degrees F.

In a large bowl, combine the oats, chopped nuts, sunflower seeds, salt, and spices. Whisk together vegetable oil and maple syrup until well-blended. Pour the oil / syrup mixture onto the dry ingredients. Toss with a flexible spatula until the oats, nuts, and seeds are evenly coated. Empty the mix onto a large baking sheet (9 x 13 inch). Bake in the oven for 30 - 35 minutes, stirring with a spatula every 10 minutes, until the granola is golden brown and fragrant.

Allow granola to cool on the pan on a wire rack. Toss in the raisins. Mix to combine.

Serve with yogurt and fresh fruit or milk.

Store in a plastic container.

Friday, October 16, 2009

Fig and Cheese Pizza


Hi Devon,

Eating the contents of your fridge is a daunting and unpleasant task. First, what do you do with your billion jars of condiments: mayo, hot sauces, relishes, jams, hoisin sauce, curries, and mustards? Then, how do you turn the contents of the fridge into a dish, let alone an entire meal? The fridge, a stronghold for all leftovers, frigid life-giver, perpetually extends the stay of leftovers, preservative-filled condiments, dairy products, and fruits. What happens when all this food must be consumed within a short period of time?

My fridge contains the ingredients to cook an array of international dishes. In one week, it will hold green onions, plums, squash, bok choy, milk, rhubarb, cucumbers, and miso paste. The variety challenges my inventiveness and skill, especially towards the end of the week. I am mindful of its contents, and spend the majority of my commute musing on the numerous possibilities.

Tomorrow, our apartment will be blessed with a new fridge, three inches taller, two inches wider, and one inch deeper than our current one. The difference in size seems minuscule, but the novelty of a new appliance has overshadowed the inconvenience of emptying the ice box. I was amazed how quickly fridge raiding went from exciting to strangely chore-like. Tucked in the back, containers of expired yogurt and boxes of leftover your-guess-is-as-good-as-mine went directly into the trash. Half empty / half full jars of mustard, the ones you keep buying because you can never find them, appear like a broad shouldered army ranked by flavor: Dijon, honey, Jack Daniels (!?), spicy, and standard yellow. With the exception of mayonnaise, most sealed jars will survive a few hours on the counter, especially on a crisp autumn night.


The main concern was perishable items, mainly cheese and fruit. I probably spend half my paycheck on cheese, so throwing it out was not an option. I pulled out a box of figs and some olive pita and made an impromptu pizza. A carton of Ben and Jerry's ice cream was dessert.

Olives, figs, and cheese are a natural and glorious combination. Bake until the cheese is melted and the figs are warmed through. Next time, I'm planning on adding proscuitto. I don't think it gets easier or more delicious than this. If I started a tapas bar, I could charge $12 for this (but don't tell anyone, it'll ruin the mystique).


Now the fridge is empty. But don't worry, it will soon fill up!

Fig and Cheese Pizza

Olive flatbread / pita bread
Cheese, I used a French cow's milk cheese called Tomme Noire (aged at least 21 days)
Handful of quartered figs
Salt
Black pepper

Preheat the oven to 350 degrees. Line a baking sheet with foil.

Place pita bread on foil. Top with slices of cheese, a salty cheese will work best here, and quartered figs. Finish with a liberal sprinkling of salt. Bake in the oven until the cheese is melted, 8 minutes. Sprinkle with freshly ground black pepper. Cut into wedges and serve warm.

Fridge off. What's for dinner?
Michelle

Tuesday, October 13, 2009

Chocolate Chip Banana Bread


Bananas on the brink of ripeness, still a bit green, or on the edge of being thrown out are my kind of bananas. I am completely unaware of all others. I love the starchiness and the slightly bitter taste of immature bananas. My mother always found this a bit weird. I begged her to buy green ones. I carefully monitored their progress from green to bright yellow, then I devoured them. Once the remaining bananas developed black spots - reincarnation - Banana Bread!


Quickbreads make easy and impressive desserts or breakfast treats. One-bowl recipes are my idea of cooking. Nothing like standing over a steamy sink filled with dirty dishes to make you regret the chicken mole enchiladas you made for dinner. Yummy, yes, but a nightmare to clean up. I eagerly await a high-powered dishwasher.

My first experience with banana bread came from the bright blue Jiffy box. I remember baking muffins with my mother. I was so excited to open the vibrantly colored box and get started. It was amazing to see muffins come out of a box filled with powder. Adding a few ingredients, milk and eggs, made tasty, fluffy muffins. Later in life, I learned all about muffins baked from scratch and I never looked back. I don't want to knock Jiffy. Jiffy along with Jell-o introduced me to cooking. For that, I will always love Jiffy and their unbeatable corn bread mix, which I've never been able to achieve from scratch.


This recipe for banana bread produces a cake with a moist crumb and an intense banana flavor. The cake is not too sweet, a fault I often find with many commercially made banana breads. I mix up the recipe a little, substituting hazelnuts for sunflower seeds or adding raisins. Banana bread is forgiving, so use whatever you have on hand. I used a standard-size loaf pan, but when the pan filled beyond two-thirds full, I got nervous and grabbed a six-cup muffin tin for the overflow. I would rather clean out an extra pan than worry about volcanic banana bread in a hot oven.


Chocolate Chip Banana Muffins/Cake

4 oz (1 stick) butter, softened or at room temperature
1 cup granulated sugar
2 large eggs
2 large ripe bananas, smashed
1 2/3 cup all purpose flour
1/3 cup almond flour
1 tsp salt
1 tsp baking powder
1/2 tsp baking soda
1 cup soy milk or milk
1/2 cup chocolate chips, bittersweet
1/2 cup sunflower seeds
1 tsp vanilla extract

Preheat oven to 400 F. Butter a standard loaf pan and a six cup muffin tin.

Sift together the flours, salt, baking powder and baking soda. Measure out one cup of soy milk or regular milk. Mash two ripe bananas.

Beat together the sugar and softened butter at medium-slow speed until light and fluffy. Add the eggs, one at a time, completely incorporating the eggs. Mix in the smashed bananas until the batter is smooth.

Add the flour mixture in three parts, alternating with the milk mixture in two parts. Mix until the flour is just moistened. Scrape down the sides of the bowl between additons. Avoid overmixing.

Gently fold in chocolate chips and sunflower seeds. Stir in vanilla.

Fill the muffin tin 2/3 full with batter. Add the remaining batter to the loaf pan.

Finish by sprinkling the tops with sunflower seeds.

Bake until lightly golden brown. Muffins for 12-15 minutes. Loaf for 35-45 minutes. Transfer to a cooling rack. Cut the loaf into 1/2 inch thick slices and serve with a steaming cup of coffee or a big scoop of yogurt.

Note: This could easily make eighteen muffins.

Toodlebug,
Michelle

Wednesday, October 7, 2009

Fish Tacos with Two Salsas

Dear Michelle,

Finally, here is the recipe for those fish tacos we made earlier in the summer. It's hard to remember, now, with a chill in the air and the wind rushing through my apartment, that not long ago light dresses and sandals felt perfect and nothing sounded more enticing for dinner than light fish with the freshest sweet-tart-spicy salsas all wrapped up in a fresh corn tortilla.


Although we made two salsas for these, and homemade tortillas, store-bought could be substituted for both in a pinch. If the pinch is laziness instead of timeliness, though, get over it; there's no comparison. Both of these salsas are bright and clean, with none of the bland-if-spicy taste of cooked, jarred salsas. Sometimes when I'm full but I just can't stop eating, I will make a taco with just salsa. Can you say that of store-bought?

Fresh tortillas are new in my life. My friend Amy introduced me to them, and I went out the next week to buy a tortilla press. Not as rubbery or crumbly as those available in stores (and we have a fairly large Latino population around here, so I'm assuming what we can buy is pretty authentic), these are soft and tender, far superior in both flavor and texture. Plus, not only are they fun to make, but you won't end up with 50 when you only need 10.

So, here goes, an ambitious first post:

Tortillas

Masa Harina - this is a particular type of corn flour which has been treated with slaked lime. The brand available around here is Maseca, which has worked fine for me.
warm water
salt (about a 1/4 - 1/2 teaspoon per cup of dough)

Mix some salt into the flour, then pour in warm water in parts and mix till the dough is soft but not sticky. I always use more than is called for on the package. Dough should be soft enough to puff slightly when cooking, but not so soft that it will stick to the plastic wrap when using the press. Nothing I've read calls for the addition of salt, but it really helps with the flavor. If you've used too little, more can easily be added later.

At this point, wrap the dough in plastic wrap and let it sit while you make the salsa.

While salsas sit, start making the tortillas. Heat skillet (I use a cast iron) without oil till hot. Line a tortilla press with a large piece of plastic wrap, then roll a ball of dough a little larger than an inch in diameter in your hands. Place in press and press to about 1/8 inch thick. This should be very easy as the dough should be soft. You do not want it to ooze out the sides, and if it is, then you are using too much dough or pressing too hard. Peel plastic from dough carefully, and put dough on skillet. Turn once the underside has colored, about a minute or two. Wrap tortillas in a towel to keep them warm. While making tortillas, marinate fish (see below).

Salsas

Here we have two kinds of salsa, a tomatillo-tomato-avocado and a peach-papaya-avocado. Can you tell how much I like avocados? Salsa is one of those things it's impossible write a recipe with perfect amounts for. I'm going to approximate; so if you like onion, or spice, or whatever, add more, or less if you hate it. You can substitute, too. Hate peaches, but love mango? There you go!

This made a lot of salsa.

1/2 red onion
limes (2-4)
bunch cilantro
2 tomatillos
2 peaches or nectarines
1/2 papaya
1/2 red bell pepper
chili oil or hot sauce
1 avocado
1 medium tomato
1 clove garlic

(Optional) roast tomatillos over gas burner. I use fondue picks to hold them. You could use a bbq, or probably even a broiler. In any case, char the skins and then set aside to cool.
Finely chop 1/2 a red onion and divide between two bowls, then finely chop the garlic and add to one bowl. Zest 1 lime into both bowls, then squeeze half of it into each. This mellows the onion and garlic. Rinse the tomatillos under the faucet, rubbing off the charred skin, then chop and add to the bowl with the garlic. Chop and add tomato.

Now chop peaches, papaya and bell pepper and add to other bowl. Vary amounts of each as desired. Chop cilantro and add to both bowls, reserving a little for the tacos. Drizzle a touch of chili oil or hot sauce in both. Stir and taste. Add the additional lime if necessary, or more heat. Let sit to meld flavors, but the avocado is added just before eating.


Fish

Use any mild white fish, about a half a pound per person, more for heavy eaters.

About 5-10 minutes before tortillas are done, put fish in a large ziplock bag with lime (zest and juice), chili powder, garlic, cumin, salt, pepper and a little olive oil. Don't marinade for too long, or you will have ceviche! I have a DIY vacuum-packing method: put the bag in a large bowl of water, sealed but for the very edge. The water will force the air out of the bag, allowing you to seal it with the marinade touching all sides of whatever it is being marinaded. That way you don't have to bother with shaking it, or flipping it, to make sure it's been evenly exposed.

Once the tortillas are done, add a little oil and then the fish to the pan, cooking quickly till it flakes. It doesn't matter if it breaks apart.

And finally, Tacos

salsa
tortillas
cooked fish
queso fresco
cilantro

Add avocado to salsas. Put fish and cheese in bowls. Dig in.


Ah, well, Summer will come again.

Tuesday, October 6, 2009

Fried Bagels

Dear Devon,

Who said that food blogs have to be about haute cuisine? As much as I daydream about labor-intensive chocolate raspberry tartes, simple, easy to prepare meals are always on my mind. Inspiration comes in every form, from the elaborate desserts at the now-defunct Payard to one-day old bagels.

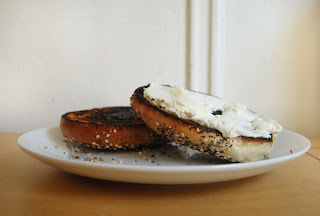
Next to beagles, bagels are one of my favorite things in the world. A freshly baked and boiled bagel, hot and warm, slathered with green-flecked scallion cream cheese is absolutely irresistible. Just thinking about this wonderful delight, I'm drooling on my keyboard. Even yesterday's bagels can make me jump out of bed. But when I'm feeling especially decadent, and there is not a chocolate croissant around, I fry a bagel in butter. It's absolute genius. The bagel develops a crisp and crunchy exterior, infused with the heady smell of melted butter, mottled and golden brown, while the bite remains chewy and dense. Any variety of bagel can be used. I generally choose an everything bagel. Sesame, salt, poppy seed, onion, I can never decide, so everything is usually the choice for one who wants it all! Delicious, delicious.


I welcome any excuse to use my whimsical bacon press. Every house should have one, if not for cooking, then for sheer nostalgia. Bacon presses belong in the days of toast racks and canning jars, both of which I endorse. Mine is particularly fun because of the cute pig cast on the pressing surface. I am also enthralled by the bold text "Bacon Press" emblazoned across the bottom, lest we forget what it is for: BACON!! If you don't have a press, you can substitute a brick, wrapped in foil. I have no experience with foil wrapped bricks, so I can't attest to their efficacy.


Fried Bagels

2 bagels, any variety
3 tbsp butter
cream cheese, of your choice

cast iron pan
bacon press

In a large cast iron pan, melt two tablespoons of butter.

Slice bagels in half along the equator and generously butter. Put the bagels cut side down into the melted butter. Place the bacon press on top of the bagels. Cook over medium heat, just until the bagels turn a golden brown. Check frequently to avoid burning your bagels.

Top with a big smear of cream cheese. Serve open-faced.

Toodles
Michelle